> ## Documentation Index
> Fetch the complete documentation index at: https://docs.praxis-ai.com/llms.txt
> Use this file to discover all available pages before exploring further.
# Custom Theme
> Integrate Praxis AI within Canvas LMS
## Introduction
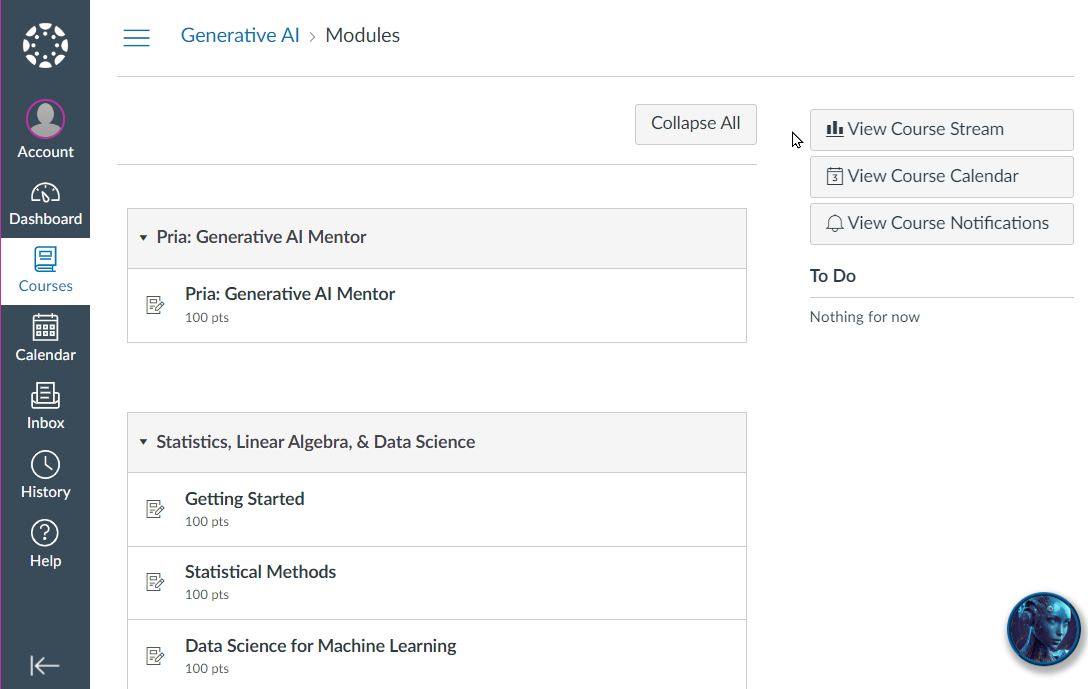
This documentation details the installation steps to set up a Praxis AI Instance into Canvas using the [Canvas Theme Editor](https://community.canvaslms.com/t5/Video-Guide/Theme-Editor-Admins/ta-p/383021). When installed in the Theme, the Instance becomes embedded into Canvas's pages.
 ***
## Prerequisites
Before you begin, ensure you have:
* [ ] **Canvas admin access** with permissions to edit themes
* [ ] **Theme Editor permissions** for your target account or sub-account
* [ ] **A Praxis AI Digital Twin** instance created at [pria.praxislxp.com](https://pria.praxislxp.com)
* [ ] **Your Digital Twin's public instance ID** (found in Configuration & Integrations)
* [ ] **Whitelisted domains**: `pria.praxislxp.com` and `prialti.praxislxp.com`
**Estimated setup time:** 20-30 minutes for first-time installation.
***
## Add a Praxis AI Instance to your Theme
To add a Praxis AI Instance globally to a Canvas account, you will upload a segment of JavaScript in the Theme used by the account or sub-account of your choice.
Download the pria-sdk-canvas.js code onto your computer, and save the file as pria-sdk-canvas.js
* We recommend storing this file in source control (GitHub, GitLab, etc.) so you can track changes to the file.
* You may also save this file into a Google Drive, and edit your customizations on an ongoing basis.
* Keep track of the version of the file and your own modification to ensure that you are using the latest and greatest.
* When you select this file to inject in your theme, Canvas uploads a copy into its own CDN therefore, you need to reload the files into Canvas after you make a change.
Refer to the [**SDK customization section**](https://docs.praxis-ai.com/mdx/integrations/canvas/theme#customizing-the-sdk) of this guide to ensure you configure the appropriate digital twins for your specific use case.
Begin your integration by organizing your Canvas environment:
1. **Create a Praxis subaccount** in your Canvas instance
2. **Move courses** that will use digital twins into this subaccount
3. **Access admin settings** and select the Praxis subaccount to continue configuration
***
## Prerequisites
Before you begin, ensure you have:
* [ ] **Canvas admin access** with permissions to edit themes
* [ ] **Theme Editor permissions** for your target account or sub-account
* [ ] **A Praxis AI Digital Twin** instance created at [pria.praxislxp.com](https://pria.praxislxp.com)
* [ ] **Your Digital Twin's public instance ID** (found in Configuration & Integrations)
* [ ] **Whitelisted domains**: `pria.praxislxp.com` and `prialti.praxislxp.com`
**Estimated setup time:** 20-30 minutes for first-time installation.
***
## Add a Praxis AI Instance to your Theme
To add a Praxis AI Instance globally to a Canvas account, you will upload a segment of JavaScript in the Theme used by the account or sub-account of your choice.
Download the pria-sdk-canvas.js code onto your computer, and save the file as pria-sdk-canvas.js
* We recommend storing this file in source control (GitHub, GitLab, etc.) so you can track changes to the file.
* You may also save this file into a Google Drive, and edit your customizations on an ongoing basis.
* Keep track of the version of the file and your own modification to ensure that you are using the latest and greatest.
* When you select this file to inject in your theme, Canvas uploads a copy into its own CDN therefore, you need to reload the files into Canvas after you make a change.
Refer to the [**SDK customization section**](https://docs.praxis-ai.com/mdx/integrations/canvas/theme#customizing-the-sdk) of this guide to ensure you configure the appropriate digital twins for your specific use case.
Begin your integration by organizing your Canvas environment:
1. **Create a Praxis subaccount** in your Canvas instance
2. **Move courses** that will use digital twins into this subaccount
3. **Access admin settings** and select the Praxis subaccount to continue configuration
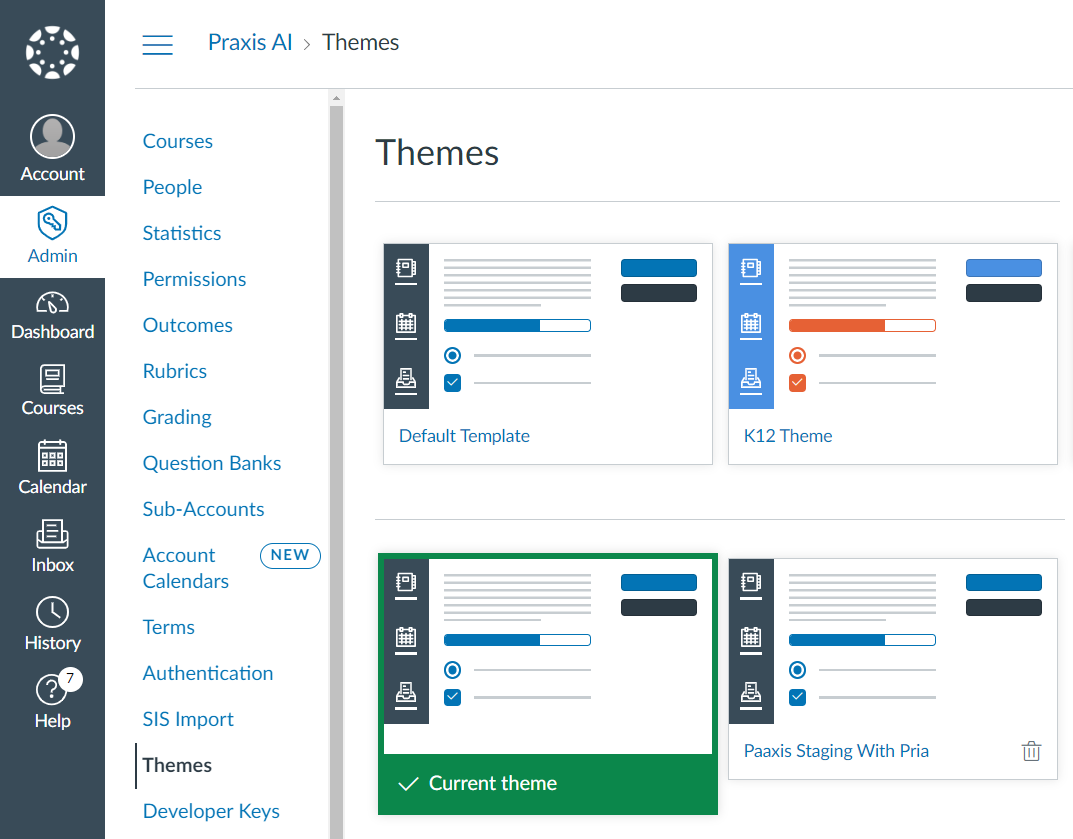
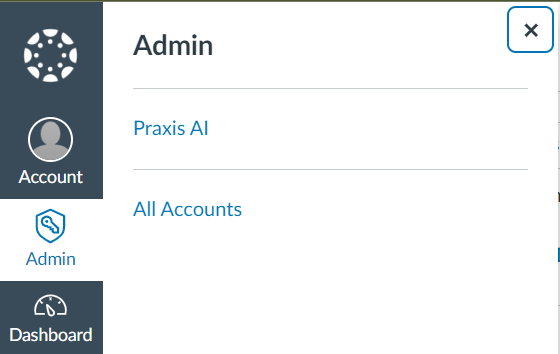 Click on the current Theme to open the Theme Editor.
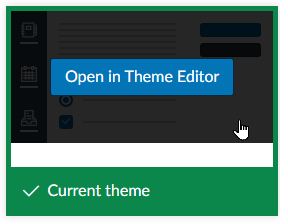
 Click on the "Edit" button to open the Theme Editor.
 Click to the Upload tab on the left.
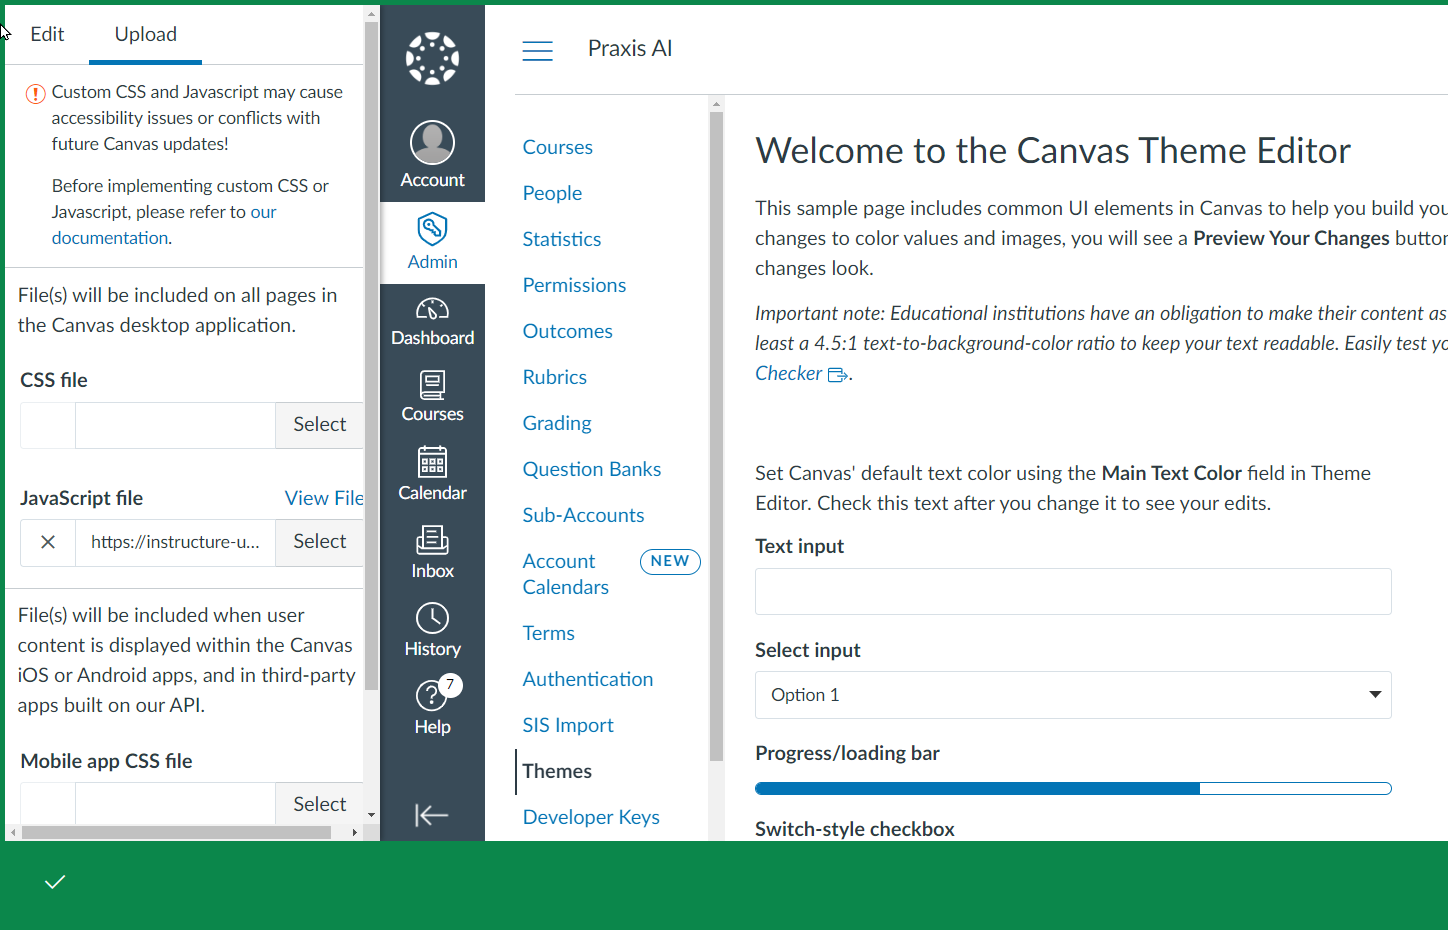 We follow instructions similar to those posted Instructure's documentation on how to upload custom JavaScript and CSS files to an account.
## Customizing the SDK
In this step, you will customize the Javascript SDK you downloaded to specify what instance of Praxis AI to use.
Edit the file `pria-sdk-canvas.js` from your download
#### Disabled by Default
If you prefer to disable Praxis AI by default set the `INSTITUTION_ID` to undefined
```javascript theme={null}
var INSTITUTION_ID;
```
#### Require Teacher Onboarding
If you prefer to use the "Teacher Onboarding" process, leave the `INSTITUTION_ID` field blank (e.g. `''`) like this:
```javascript theme={null}
var INSTITUTION_ID = '';
```
In this modality, Teacher or Administrator alike will select an existing instance or create a new instance at runtime.
#### Assign all to Praxis AI Instance
If prefer to assign everyone to the same Praxis AI instance (for the sub-account), then set the value of the `INSTITUTION_ID` to the instance public ID given to you by Praxis , ex: 5fd6d7a4-4cc7-4e04-8473-e89aef4e…
```javascript theme={null}
var INSTITUTION_ID = '5fd6d7a4-4cc7-4e04-8473-e89aef4e...';
```
The value of the `INSTITUTION_ID` field is unique to your instance of Pria. Keep this ID confidential.
#### INSTITUTION\_ID Reference
| Value | Behavior |
| ------------------------------ | ---------------------------------------------------------------------------------------------------------------------------------------------------------------------------- |
| `undefined` | Pria is **disabled** — the button does not appear and nothing loads. Use this as the default when you want to selectively enable Pria only for specific courses or accounts. |
| `''` (empty string) | **Teacher Onboarding** — the teacher (or admin) is prompted to select an existing Digital Twin or create a new one and associate it to the current course. |
| `'5fd6d7a4-...'` (specific ID) | **Fixed Digital Twin** — all users in this context are connected to the specified Praxis AI instance. No onboarding wizard is shown. |
You can change the `INSTITUTION_ID` value dynamically inside conditional functions like `isInCourses()`, `isInAccounts()`, or `hasAnyRole()` to assign different behaviors per course, account, or user role.
## Customize the Instance icon
You can change the icon of the button that will appear on the screen with the following variable: If you like to keep using Pria's icon, leave the `INSTITUTION_ICON_URL` as undefined
We follow instructions similar to those posted Instructure's documentation on how to upload custom JavaScript and CSS files to an account.
## Customizing the SDK
In this step, you will customize the Javascript SDK you downloaded to specify what instance of Praxis AI to use.
Edit the file `pria-sdk-canvas.js` from your download
#### Disabled by Default
If you prefer to disable Praxis AI by default set the `INSTITUTION_ID` to undefined
```javascript theme={null}
var INSTITUTION_ID;
```
#### Require Teacher Onboarding
If you prefer to use the "Teacher Onboarding" process, leave the `INSTITUTION_ID` field blank (e.g. `''`) like this:
```javascript theme={null}
var INSTITUTION_ID = '';
```
In this modality, Teacher or Administrator alike will select an existing instance or create a new instance at runtime.
#### Assign all to Praxis AI Instance
If prefer to assign everyone to the same Praxis AI instance (for the sub-account), then set the value of the `INSTITUTION_ID` to the instance public ID given to you by Praxis , ex: 5fd6d7a4-4cc7-4e04-8473-e89aef4e…
```javascript theme={null}
var INSTITUTION_ID = '5fd6d7a4-4cc7-4e04-8473-e89aef4e...';
```
The value of the `INSTITUTION_ID` field is unique to your instance of Pria. Keep this ID confidential.
#### INSTITUTION\_ID Reference
| Value | Behavior |
| ------------------------------ | ---------------------------------------------------------------------------------------------------------------------------------------------------------------------------- |
| `undefined` | Pria is **disabled** — the button does not appear and nothing loads. Use this as the default when you want to selectively enable Pria only for specific courses or accounts. |
| `''` (empty string) | **Teacher Onboarding** — the teacher (or admin) is prompted to select an existing Digital Twin or create a new one and associate it to the current course. |
| `'5fd6d7a4-...'` (specific ID) | **Fixed Digital Twin** — all users in this context are connected to the specified Praxis AI instance. No onboarding wizard is shown. |
You can change the `INSTITUTION_ID` value dynamically inside conditional functions like `isInCourses()`, `isInAccounts()`, or `hasAnyRole()` to assign different behaviors per course, account, or user role.
## Customize the Instance icon
You can change the icon of the button that will appear on the screen with the following variable: If you like to keep using Pria's icon, leave the `INSTITUTION_ICON_URL` as undefined
 ```javascript theme={null}
var INSTITUTION_ICON_URL;
```
If you want to change the icon, set the value of the icon URL to a new location, like the example below:
```javascript theme={null}
var INSTITUTION_ICON_URL = 'https://pria.praxislxp.com/logo192.png';
```
We recommend using a square image, no larger than 192 x 192 pixels, that also supports transparency (like PNG or webp format) - This image should be placed on a Content Delivery Network that allows access across origin or domains (CORS Policy)
## Display Options
You can customize the position, size and container of the Instance's button as well as the main window with the following Javascript `DISPLAY_OPTIONS` variable:
```javascript theme={null}
var DISPLAY_OPTIONS = {
fullScreen: false, // True for expanded in full screen
openOnLoad: false, // True to open Pria immediately when loaded
buttonWidth: '80px', // Size of the button containing the Pria Logo
buttonPosition: 'fixed', // Determine the position of the button (fixed, relative, sticky)
buttonPositionRight: '20px', // Position of the button relative to the right edge of the screen
buttonPositionBottom: '20px', // Position of the button relative to the bottom edge of the screen
buttonNoBounce: true, // Determine whether the button will not bounce when Pria is closed
priaContainerId: '', // Id of the container receiving pria window (default empty uses BODY)
buttonContainerId: '', // Id of the container receiving the button (default empty uses BODY)
allowPop: false, // True to show the button and pop Pria out the containing iFrame
};
```
The options are as below:
| Option | Default / Allowed Values | Description | Notes |
| ------------------------ | ------------------------------------------- | --------------------------------------------------------------------------------------------- | --------------------------------------------------------------------------------------------------------------------------------------- |
| **fullScreen** | `true` \| `false` *(default)* | Display Pria in fullscreen. | |
| **openOnLoad** | `true` \| `false` *(default)* | Open Pria immediately on load or keep closed until user clicks the Pria button. | |
| **buttonWidth** | CSS width value \| `'80px'` *(default)* | Size of the Pria button. | See [CSS width examples](https://developer.mozilla.org/en-US/docs/Web/CSS/width). |
| **buttonPosition** | CSS position value \| `'fixed'` *(default)* | Position type of the button. Default is `fixed`, but can be `relative` or `absolute`. | |
| **buttonPositionBottom** | CSS bottom value \| `'20px'` | Distance from the bottom edge of the screen (only applies to `fixed` or `absolute` position). | See [CSS bottom examples](https://developer.mozilla.org/en-US/docs/Web/CSS/bottom). Example: `calc(100% - 80px)` to place icon at top. |
| **buttonPositionRight** | CSS right value \| `'20px'` | Distance from the right edge of the screen (only applies to `fixed` or `absolute` position). | See [CSS right examples](https://developer.mozilla.org/en-US/docs/Web/CSS/right). Example: `calc(100% - 40px)` to place icon at center. |
| **buttonNoBounce** | `true` *(default)* \| `false` | Whether the button bounces when displayed. | Default: no bounce. |
| **priaContainerId** | Element ID \| `''` *(BODY by default)* | Parent element for Pria UI iFrame. | Empty value appends to ``. |
| **buttonContainerId** | Element ID \| `''` *(BODY by default)* | Parent element for the Pria button. | Empty value appends to ``. |
| **allowPop** | `true` \| `false` *(default)* | Option to open Pria in a new tab. | **Deprecated** due to third-party cookie restrictions. |
The Javascript SDK loads Pria with the `loadPria()` function.
```javascript theme={null}
loadPria();
```
the loadPria() function will not load Pria twice if it happens to be called more than once.
In the SDK, the `loadPria()` function is placed when the student or teacher is on a course page. This determination is done using a regular expression with the function `onPage()` like below:
```javascript lines theme={null}
// load on all courses page (default)
// Ex: https://praxis-ai.instructure.com/courses/106
onPage(/\/courses\/\d+/, function (isOnPage) {
if (isOnPage) {
loadPria();
}
});
```
In Canvas, course pages have URLs that match this structure [https://my-university.canvas.edu/courses/106/…](https://my-university.canvas.edu/courses/106/…) and this is what we rely on to call loadPria() so it loads only for courses.
In the SDK, we also load Praxis AI in the Theme Editor so that we can preview Pria after we edit the custom theme. This is not required
```javascript lines theme={null}
// load on theme_editor page
// Ex: url https://praxis-ai.instructure.com/accounts/1/theme_editor
onPage(/\/theme_editor/, function (isOnPage) {
if (isOnPage) {
loadPria();
}
});
```
The page URL match uses [Regular Expressions](https://developer.mozilla.org/en-US/docs/Web/JavaScript/Guide/Regular_expressions)
## Load for certain courses
It is common that administrator want to load a Instance only for certain courses, while it stays disabled for all the others.
In this case, set the default `INSTITUTION_ID` to undefined.
```javascript lines theme={null}
var INSTITUTION_ID; // undefined, "", or valid ID;
```
On line 1, inside the block that determines that we are in a course page, add the following code:
```javascript lines theme={null}
var coursesForSpecificInstance = [79875, 72856, 55621];
isInCourses(coursesForSpecificInstance, function (isCourse) {
if (isCourse) {
INSTITUTION_ID = '1234-5245-ss-aaa';
INSTITUTION_ICON_URL = 'https://cdn.domain.edu/my/icon.png';
}
});
```
### Institution Specific Courses
```javascript lines theme={null}
// load on all courses page (default)
// Ex: https://praxis-ai.instructure.com/courses/106
onPage(/\/courses\/\d+/, function (isOnPage) {
if (isOnPage) {
var coursesForSpecificInstance = [79875, 72856, 55621];
isInCourses(coursesForSpecificInstance, function (isCourse) {
if (isCourse) {
INSTITUTION_ID = '1234-5245-ss-aaa';
INSTITUTION_ICON_URL = 'https://cdn.domain.edu/my/icon.png';
}
});
loadPria();
}
});
```
This code means that if the current course is either `79875`, `72856`, or `55621`, then we set the `INSTITUTION_ID` to a specific instance, and customize the icon to our own URL
### Teacher Specific Courses
Similarly, you may choose to enable the Instance (let teachers create their own twins) for a specific set of courses.
To do so, simply set the `INSTITUTION_ID` to empty string like this:
```JavaScript theme={null}
var coursesForDigitalTwin = [69875, 62856, 65621]
isInCourses(coursesForDigitalTwin, function (isCourse) {
if (isCourse) {
INSTITUTION_ID = '';
INSTITUTION_ICON_URL = undefined;
}
})
```
The resulting code will look like this:
```javascript lines theme={null}
// load on all courses page (default)
// Ex: https://praxis-ai.instructure.com/courses/106
onPage(/\/courses\/\d+/, function (isOnPage) {
if (isOnPage) {
var coursesForSpecificInstance = [79875, 72856, 55621];
isInCourses(coursesForSpecificInstance, function (isCourse) {
if (isCourse) {
INSTITUTION_ID = '1234-5245-ss-aaa';
INSTITUTION_ICON_URL = 'https://cdn.domain.edu/my/icon.png';
}
});
var coursesForDigitalTwin = [69875, 62856, 65621];
isInCourses(coursesForDigitalTwin, function (isCourse) {
if (isCourse) {
INSTITUTION_ID = '';
INSTITUTION_ICON_URL = undefined;
}
});
loadPria();
}
});
```
### Instance per Teacher
You can write Javascript code that selects a specific Praxis AI instance for each teacher courses for example:
```javascript lines theme={null}
// load on all courses page (default)
// Ex: https://praxis-ai.instructure.com/courses/106
onPage(/\/courses\/\d+/, function (isOnPage) {
if (isOnPage) {
var Quirk = [2250992];
isInCourses(Quirk, function (isCourse) {
if (isCourse) {
INSTITUTION_ID = '7813dada-29ab-48a0-8d33-255354d8XXc';
INSTITUTION_ICON_URL = 'https://elearning.inst.edu/wp-content/up1';
}
});
var Chauncey = [2351092, 21317];
isInCourses(Chauncey, function (isCourse) {
if (isCourse) {
INSTITUTION_ID = '6c5cde70-2a8f-4986-bdc5-a5e4fe1fYYY';
INSTITUTION_ICON_URL = 'https://elearning.inst.edu/wp-content/up1';
}
});
loadPria();
}
});
```
## Nesting Conditions
You can nest conditions to create complex logical rules. For example, place an `isInAccounts()` check inside an `onPage()` conditional to control loading by both page type and Canvas account:
```
IF onPage(course) THEN
IF isInAccounts(123) THEN
set INSTITUTION_ID = undefined (don't load Pria)
ELSE
loadPria()
END IF
END IF
```
In JavaScript, this translates to:
```javascript lines theme={null}
onPage(/\/courses\/\d+/, function (isOnPage) {
if (isOnPage) {
// Disable Pria for courses in account 123
var excludedAccounts = [123]
isInAccounts(excludedAccounts, function (isAccount) {
if (isAccount) {
// Don't load Pria for this account
INSTITUTION_ID = undefined
} else {
// Load Pria for all other accounts
loadPria()
}
})
}
})
```
You can combine any of the SDK functions (`onPage`, `isInAccounts`, `isInCourses`, `hasAnyRole`, `isStudent`, etc.) to build the exact logic you need. Remember the three `INSTITUTION_ID` values you can set inside these conditionals:
| Set to | Effect |
| -------------------- | ----------------------------------------- |
| `undefined` | Pria will **not load** |
| `''` | Teacher chooses or creates a Digital Twin |
| `'your-instance-id'` | Loads a specific Digital Twin |
Here is a more advanced example that combines account filtering with course-specific instances:
```javascript lines theme={null}
onPage(/\/courses\/\d+/, function (isOnPage) {
if (isOnPage) {
// Exclude a specific account entirely
var excludedAccounts = [999]
isInAccounts(excludedAccounts, function (isAccount) {
if (isAccount) {
INSTITUTION_ID = undefined
return
}
// Assign a specific Digital Twin for certain courses
var mathCourses = [101, 102, 103]
isInCourses(mathCourses, function (isCourse) {
if (isCourse) {
INSTITUTION_ID = 'abc123-math-twin-id'
INSTITUTION_ICON_URL = 'https://cdn.example.edu/math-icon.png'
}
})
// Let teachers onboard for all other courses
if (!INSTITUTION_ID) {
INSTITUTION_ID = ''
}
loadPria()
})
}
})
```
## Useful Functions
The Javascript SDK has a lot of additional useful functions you can use. Let's take a look at those.
The function hasAnyRole() determines if the current user has the specified role (ex:user, teacher, admin,root\_admin)
```javascript lines theme={null}
// load for a user role
// ex: user, teacher, admin, root_admin, etc.
hasAnyRole('user', function (hasRole) {
if (hasRole) {
// loadPria()
}
})
```
The function isUser() determines if the current user is the one specified by id (ex: 1)
```javascript lines theme={null}
// load for a specific user
isUser(1, function (isUser) {
if (isUser) {
// loadPria()
}
})
```
The isInUsers() function determines if the current user is in the array of specific user ids
```javascript lines theme={null}
// load for specific users
var userIds= [1,2, 3]
isInUsers(userIds, function (isUser) {
if (isUser) {
// loadPria()
}
})
```
The function isStudent() determines if the current user is a student
```javascript theme={null}
// load if a student
isStudent(function (isStudent) {
if (isStudent) {
// loadPria()
}
});
```
The function isCourse() determines if the current page is in a specific course (ex: id 123)
```javascript lines theme={null}
// load for a specific course
isCourse(123, function (isCourse) {
if (isCourse) {
// loadPria()
}
})
```
The function isInCourses() determines if the current course is in an array of specific courses
```javascript lines theme={null}
var courseIds = [1234, 2345]
isInCourses(courseIds, function (isCourse) {
if (isCourse) {
// loadPria()
}
})
```
The onElementRendered() function is triggered when an element is fully displayed in the page Example below is an anchor referenced by ID create\_ticket.
```javascript lines theme={null}
// Load with an action on a page using el (a jquery element collection)
onElementRendered('a[href=#create_ticket]', function (el) {
// loadPria()
});
```
The isInAccounts() function determines if the current Canvas account (or sub-account) is in an array of specific account IDs. This is useful when you want to load a specific Digital Twin only for courses within certain Canvas sub-accounts.
It reads `ENV.ACCOUNT_ID` from the Canvas environment and checks whether it matches any of the provided IDs.
```javascript lines theme={null}
// load for specific Canvas sub-accounts only
var accountIds = [123, 234]
isInAccounts(accountIds, function (isAccount) {
if (isAccount) {
INSTITUTION_ID = '1234-5245-ss-aaa'
loadPria()
}
})
```
You can also use it to disable Pria for all accounts except the ones listed:
```javascript lines theme={null}
var allowedAccounts = [123, 234]
isInAccounts(allowedAccounts, function (isAccount) {
if (isAccount) {
INSTITUTION_ID = ''
INSTITUTION_ICON_URL = undefined
loadPria()
} else {
INSTITUTION_ID = undefined
}
})
```
## The ENV variable
In Canvas, a Javascript object called `ENV` is available to any pages rendered in the Application. When injected as a Theme, the Instance has access to the variable and uses it to determine who is the current user, or what course is he/she launching.
To review the properties made available by the `ENV` variable, open a course page in Canvas, and launch the Developer Mode (F12 on Windows - developer tools on Mac) then in the Console window, type ENV then press the ENTER key.
Here is an example of such variable:
```
14:27:02.413 ENV
14:27:02.448 {ASSET_HOST: 'https://dul1hjcxv0uqb.cloudfront.net', active_brand_config_json_url: 'https://dul1hjcxv0uqb.cloudfront.net/dist/brand…bl…/variables-7dd4b8981a9f0e021ec0229e4bd5873.json', active_brand_config: {...}, confetti_branding_enabled: false, url_to_what_gets_loaded_inside_the_tinymce_editor_css: Array(3), …}
ACCOUNT_ID: "1"
ASSET_HOST: "https://dul1hjcxv0uqb.cloudfront.net"
BIGEASY_LOCALE: "en_US"
CAN_VIEW_CONTENT_SHARES: true
CONTEXT_TIMEZONE: "America/Los_Angeles"
DATA_COLLECTION_ENDPOINT: "https://canvas-frontend-data-iad.prod..."
DEEP_LINKING_LOGGING: null
DEEP_LINKING_POST_MESSAGE_ORIGIN: "https://praxis-ai.instructure..."
DIRECT_SHARE_ENABLED: false
DOMAIN_ROOT_ACCOUNT_ID: "24379000000000001"
FEATURES: {featured_help_links: true, lti_platform_storage: true, ...}
FULLCALENDAR_LOCALE: "en"
FULL_STORY_ENABLED: false
K5_HOMEROOM_COURSE: false
K5_SUBJECT_COURSE: false
K5_USER: false
LOCALE: "en"
LOCALES: ['en']
LOCALE_TRANSLATION_FILE: "/dist/javascripts/translations/en-88841"
LTI_LAUNCH_FRAME_ALLOWANCES: (8) ['geolocation*', 'microphone*', …]
MOMENT_LOCALE: "en"
RAILS_ENVIRONMENT: "Production"
SENTRY_FRONTEND: {dsn: "https://355a1d96712e4038ac25aa852fa79a8f8"}
SETTINGS: {open_registration: false, collapse_global_nav: false, …}
TIMEZONE: "America/Los_Angeles"
USE_CLASSIC_FONT: false
account_id: "1"
active_brand_config: {md5: "ce87aff671f275c7fa8b620dea9768b", ...}
active_brand_config_json_url: "https://dul1hjcxv0uqb.cloudfront.net/dist/brand..."
active_context_tab: "brand_configs"
allowGlobalIncludes: true
```
The Instance makes use of the
* `current_user` property
```
current_user:
anonymous_id: "32"
avatar_image_url: "https://praxis-ai.instructure.com/images/ display_name: "Hugo Lebegue"
email: "hugo@praxis-ai.com"
html_url: "https://praxis-ai.instructure.com/about/110"
id: "110"
```
* `current_user_roles` property:
```
current_user_roles: Array(5)
0: "user"
1: "student"
2: "teacher"
3: "admin"
4: "root_admin"
```
* `current_context` property:
```
current_context: id: "213"
name: "Hugo"
type: "Course"
url: "https://praxis-ai.instructure.com/courses/213'
```
## Install the Instance SDK into Theme
Once you have customized your SDK Javascript file and added the logic to load the Instance when the proper conditions are met, you are ready to add it to your current Theme
* In the Theme Editor, Upload Tab, under the JavaScript File section, click on the Select button
* Select the pria-sdk-canvas.js that you just customized from your download folder, then click OK
* The theme Editor will download the Javascript onto Canvas content delivery network so it becomes available to the theme.
* Click on the Preview Your Changes button
* Verify that the Instance is running properly in Preview mode
* The Instance Icon should appear at the bottom of the screen in preview mode
* The Instance UI should open and connect upon click on the icon
* If the Instance appears properly in Preview mode, click the Save to apply the changes in the Theme and return to the Theme selector.
* The Instance Icon should display properly
* Congratulations, the Instance is now installed in your theme.
* To verify, login using a standard User account, and navigate to the section of Canvas where you are loading the Instance, example below in a course
## Subaccounts
Canvas allows administrators to set up themes for sub accounts. Use this technique to enable Praxis AI in a Theme for specific user population/courses.
```javascript theme={null}
var INSTITUTION_ICON_URL;
```
If you want to change the icon, set the value of the icon URL to a new location, like the example below:
```javascript theme={null}
var INSTITUTION_ICON_URL = 'https://pria.praxislxp.com/logo192.png';
```
We recommend using a square image, no larger than 192 x 192 pixels, that also supports transparency (like PNG or webp format) - This image should be placed on a Content Delivery Network that allows access across origin or domains (CORS Policy)
## Display Options
You can customize the position, size and container of the Instance's button as well as the main window with the following Javascript `DISPLAY_OPTIONS` variable:
```javascript theme={null}
var DISPLAY_OPTIONS = {
fullScreen: false, // True for expanded in full screen
openOnLoad: false, // True to open Pria immediately when loaded
buttonWidth: '80px', // Size of the button containing the Pria Logo
buttonPosition: 'fixed', // Determine the position of the button (fixed, relative, sticky)
buttonPositionRight: '20px', // Position of the button relative to the right edge of the screen
buttonPositionBottom: '20px', // Position of the button relative to the bottom edge of the screen
buttonNoBounce: true, // Determine whether the button will not bounce when Pria is closed
priaContainerId: '', // Id of the container receiving pria window (default empty uses BODY)
buttonContainerId: '', // Id of the container receiving the button (default empty uses BODY)
allowPop: false, // True to show the button and pop Pria out the containing iFrame
};
```
The options are as below:
| Option | Default / Allowed Values | Description | Notes |
| ------------------------ | ------------------------------------------- | --------------------------------------------------------------------------------------------- | --------------------------------------------------------------------------------------------------------------------------------------- |
| **fullScreen** | `true` \| `false` *(default)* | Display Pria in fullscreen. | |
| **openOnLoad** | `true` \| `false` *(default)* | Open Pria immediately on load or keep closed until user clicks the Pria button. | |
| **buttonWidth** | CSS width value \| `'80px'` *(default)* | Size of the Pria button. | See [CSS width examples](https://developer.mozilla.org/en-US/docs/Web/CSS/width). |
| **buttonPosition** | CSS position value \| `'fixed'` *(default)* | Position type of the button. Default is `fixed`, but can be `relative` or `absolute`. | |
| **buttonPositionBottom** | CSS bottom value \| `'20px'` | Distance from the bottom edge of the screen (only applies to `fixed` or `absolute` position). | See [CSS bottom examples](https://developer.mozilla.org/en-US/docs/Web/CSS/bottom). Example: `calc(100% - 80px)` to place icon at top. |
| **buttonPositionRight** | CSS right value \| `'20px'` | Distance from the right edge of the screen (only applies to `fixed` or `absolute` position). | See [CSS right examples](https://developer.mozilla.org/en-US/docs/Web/CSS/right). Example: `calc(100% - 40px)` to place icon at center. |
| **buttonNoBounce** | `true` *(default)* \| `false` | Whether the button bounces when displayed. | Default: no bounce. |
| **priaContainerId** | Element ID \| `''` *(BODY by default)* | Parent element for Pria UI iFrame. | Empty value appends to ``. |
| **buttonContainerId** | Element ID \| `''` *(BODY by default)* | Parent element for the Pria button. | Empty value appends to ``. |
| **allowPop** | `true` \| `false` *(default)* | Option to open Pria in a new tab. | **Deprecated** due to third-party cookie restrictions. |
The Javascript SDK loads Pria with the `loadPria()` function.
```javascript theme={null}
loadPria();
```
the loadPria() function will not load Pria twice if it happens to be called more than once.
In the SDK, the `loadPria()` function is placed when the student or teacher is on a course page. This determination is done using a regular expression with the function `onPage()` like below:
```javascript lines theme={null}
// load on all courses page (default)
// Ex: https://praxis-ai.instructure.com/courses/106
onPage(/\/courses\/\d+/, function (isOnPage) {
if (isOnPage) {
loadPria();
}
});
```
In Canvas, course pages have URLs that match this structure [https://my-university.canvas.edu/courses/106/…](https://my-university.canvas.edu/courses/106/…) and this is what we rely on to call loadPria() so it loads only for courses.
In the SDK, we also load Praxis AI in the Theme Editor so that we can preview Pria after we edit the custom theme. This is not required
```javascript lines theme={null}
// load on theme_editor page
// Ex: url https://praxis-ai.instructure.com/accounts/1/theme_editor
onPage(/\/theme_editor/, function (isOnPage) {
if (isOnPage) {
loadPria();
}
});
```
The page URL match uses [Regular Expressions](https://developer.mozilla.org/en-US/docs/Web/JavaScript/Guide/Regular_expressions)
## Load for certain courses
It is common that administrator want to load a Instance only for certain courses, while it stays disabled for all the others.
In this case, set the default `INSTITUTION_ID` to undefined.
```javascript lines theme={null}
var INSTITUTION_ID; // undefined, "", or valid ID;
```
On line 1, inside the block that determines that we are in a course page, add the following code:
```javascript lines theme={null}
var coursesForSpecificInstance = [79875, 72856, 55621];
isInCourses(coursesForSpecificInstance, function (isCourse) {
if (isCourse) {
INSTITUTION_ID = '1234-5245-ss-aaa';
INSTITUTION_ICON_URL = 'https://cdn.domain.edu/my/icon.png';
}
});
```
### Institution Specific Courses
```javascript lines theme={null}
// load on all courses page (default)
// Ex: https://praxis-ai.instructure.com/courses/106
onPage(/\/courses\/\d+/, function (isOnPage) {
if (isOnPage) {
var coursesForSpecificInstance = [79875, 72856, 55621];
isInCourses(coursesForSpecificInstance, function (isCourse) {
if (isCourse) {
INSTITUTION_ID = '1234-5245-ss-aaa';
INSTITUTION_ICON_URL = 'https://cdn.domain.edu/my/icon.png';
}
});
loadPria();
}
});
```
This code means that if the current course is either `79875`, `72856`, or `55621`, then we set the `INSTITUTION_ID` to a specific instance, and customize the icon to our own URL
### Teacher Specific Courses
Similarly, you may choose to enable the Instance (let teachers create their own twins) for a specific set of courses.
To do so, simply set the `INSTITUTION_ID` to empty string like this:
```JavaScript theme={null}
var coursesForDigitalTwin = [69875, 62856, 65621]
isInCourses(coursesForDigitalTwin, function (isCourse) {
if (isCourse) {
INSTITUTION_ID = '';
INSTITUTION_ICON_URL = undefined;
}
})
```
The resulting code will look like this:
```javascript lines theme={null}
// load on all courses page (default)
// Ex: https://praxis-ai.instructure.com/courses/106
onPage(/\/courses\/\d+/, function (isOnPage) {
if (isOnPage) {
var coursesForSpecificInstance = [79875, 72856, 55621];
isInCourses(coursesForSpecificInstance, function (isCourse) {
if (isCourse) {
INSTITUTION_ID = '1234-5245-ss-aaa';
INSTITUTION_ICON_URL = 'https://cdn.domain.edu/my/icon.png';
}
});
var coursesForDigitalTwin = [69875, 62856, 65621];
isInCourses(coursesForDigitalTwin, function (isCourse) {
if (isCourse) {
INSTITUTION_ID = '';
INSTITUTION_ICON_URL = undefined;
}
});
loadPria();
}
});
```
### Instance per Teacher
You can write Javascript code that selects a specific Praxis AI instance for each teacher courses for example:
```javascript lines theme={null}
// load on all courses page (default)
// Ex: https://praxis-ai.instructure.com/courses/106
onPage(/\/courses\/\d+/, function (isOnPage) {
if (isOnPage) {
var Quirk = [2250992];
isInCourses(Quirk, function (isCourse) {
if (isCourse) {
INSTITUTION_ID = '7813dada-29ab-48a0-8d33-255354d8XXc';
INSTITUTION_ICON_URL = 'https://elearning.inst.edu/wp-content/up1';
}
});
var Chauncey = [2351092, 21317];
isInCourses(Chauncey, function (isCourse) {
if (isCourse) {
INSTITUTION_ID = '6c5cde70-2a8f-4986-bdc5-a5e4fe1fYYY';
INSTITUTION_ICON_URL = 'https://elearning.inst.edu/wp-content/up1';
}
});
loadPria();
}
});
```
## Nesting Conditions
You can nest conditions to create complex logical rules. For example, place an `isInAccounts()` check inside an `onPage()` conditional to control loading by both page type and Canvas account:
```
IF onPage(course) THEN
IF isInAccounts(123) THEN
set INSTITUTION_ID = undefined (don't load Pria)
ELSE
loadPria()
END IF
END IF
```
In JavaScript, this translates to:
```javascript lines theme={null}
onPage(/\/courses\/\d+/, function (isOnPage) {
if (isOnPage) {
// Disable Pria for courses in account 123
var excludedAccounts = [123]
isInAccounts(excludedAccounts, function (isAccount) {
if (isAccount) {
// Don't load Pria for this account
INSTITUTION_ID = undefined
} else {
// Load Pria for all other accounts
loadPria()
}
})
}
})
```
You can combine any of the SDK functions (`onPage`, `isInAccounts`, `isInCourses`, `hasAnyRole`, `isStudent`, etc.) to build the exact logic you need. Remember the three `INSTITUTION_ID` values you can set inside these conditionals:
| Set to | Effect |
| -------------------- | ----------------------------------------- |
| `undefined` | Pria will **not load** |
| `''` | Teacher chooses or creates a Digital Twin |
| `'your-instance-id'` | Loads a specific Digital Twin |
Here is a more advanced example that combines account filtering with course-specific instances:
```javascript lines theme={null}
onPage(/\/courses\/\d+/, function (isOnPage) {
if (isOnPage) {
// Exclude a specific account entirely
var excludedAccounts = [999]
isInAccounts(excludedAccounts, function (isAccount) {
if (isAccount) {
INSTITUTION_ID = undefined
return
}
// Assign a specific Digital Twin for certain courses
var mathCourses = [101, 102, 103]
isInCourses(mathCourses, function (isCourse) {
if (isCourse) {
INSTITUTION_ID = 'abc123-math-twin-id'
INSTITUTION_ICON_URL = 'https://cdn.example.edu/math-icon.png'
}
})
// Let teachers onboard for all other courses
if (!INSTITUTION_ID) {
INSTITUTION_ID = ''
}
loadPria()
})
}
})
```
## Useful Functions
The Javascript SDK has a lot of additional useful functions you can use. Let's take a look at those.
The function hasAnyRole() determines if the current user has the specified role (ex:user, teacher, admin,root\_admin)
```javascript lines theme={null}
// load for a user role
// ex: user, teacher, admin, root_admin, etc.
hasAnyRole('user', function (hasRole) {
if (hasRole) {
// loadPria()
}
})
```
The function isUser() determines if the current user is the one specified by id (ex: 1)
```javascript lines theme={null}
// load for a specific user
isUser(1, function (isUser) {
if (isUser) {
// loadPria()
}
})
```
The isInUsers() function determines if the current user is in the array of specific user ids
```javascript lines theme={null}
// load for specific users
var userIds= [1,2, 3]
isInUsers(userIds, function (isUser) {
if (isUser) {
// loadPria()
}
})
```
The function isStudent() determines if the current user is a student
```javascript theme={null}
// load if a student
isStudent(function (isStudent) {
if (isStudent) {
// loadPria()
}
});
```
The function isCourse() determines if the current page is in a specific course (ex: id 123)
```javascript lines theme={null}
// load for a specific course
isCourse(123, function (isCourse) {
if (isCourse) {
// loadPria()
}
})
```
The function isInCourses() determines if the current course is in an array of specific courses
```javascript lines theme={null}
var courseIds = [1234, 2345]
isInCourses(courseIds, function (isCourse) {
if (isCourse) {
// loadPria()
}
})
```
The onElementRendered() function is triggered when an element is fully displayed in the page Example below is an anchor referenced by ID create\_ticket.
```javascript lines theme={null}
// Load with an action on a page using el (a jquery element collection)
onElementRendered('a[href=#create_ticket]', function (el) {
// loadPria()
});
```
The isInAccounts() function determines if the current Canvas account (or sub-account) is in an array of specific account IDs. This is useful when you want to load a specific Digital Twin only for courses within certain Canvas sub-accounts.
It reads `ENV.ACCOUNT_ID` from the Canvas environment and checks whether it matches any of the provided IDs.
```javascript lines theme={null}
// load for specific Canvas sub-accounts only
var accountIds = [123, 234]
isInAccounts(accountIds, function (isAccount) {
if (isAccount) {
INSTITUTION_ID = '1234-5245-ss-aaa'
loadPria()
}
})
```
You can also use it to disable Pria for all accounts except the ones listed:
```javascript lines theme={null}
var allowedAccounts = [123, 234]
isInAccounts(allowedAccounts, function (isAccount) {
if (isAccount) {
INSTITUTION_ID = ''
INSTITUTION_ICON_URL = undefined
loadPria()
} else {
INSTITUTION_ID = undefined
}
})
```
## The ENV variable
In Canvas, a Javascript object called `ENV` is available to any pages rendered in the Application. When injected as a Theme, the Instance has access to the variable and uses it to determine who is the current user, or what course is he/she launching.
To review the properties made available by the `ENV` variable, open a course page in Canvas, and launch the Developer Mode (F12 on Windows - developer tools on Mac) then in the Console window, type ENV then press the ENTER key.
Here is an example of such variable:
```
14:27:02.413 ENV
14:27:02.448 {ASSET_HOST: 'https://dul1hjcxv0uqb.cloudfront.net', active_brand_config_json_url: 'https://dul1hjcxv0uqb.cloudfront.net/dist/brand…bl…/variables-7dd4b8981a9f0e021ec0229e4bd5873.json', active_brand_config: {...}, confetti_branding_enabled: false, url_to_what_gets_loaded_inside_the_tinymce_editor_css: Array(3), …}
ACCOUNT_ID: "1"
ASSET_HOST: "https://dul1hjcxv0uqb.cloudfront.net"
BIGEASY_LOCALE: "en_US"
CAN_VIEW_CONTENT_SHARES: true
CONTEXT_TIMEZONE: "America/Los_Angeles"
DATA_COLLECTION_ENDPOINT: "https://canvas-frontend-data-iad.prod..."
DEEP_LINKING_LOGGING: null
DEEP_LINKING_POST_MESSAGE_ORIGIN: "https://praxis-ai.instructure..."
DIRECT_SHARE_ENABLED: false
DOMAIN_ROOT_ACCOUNT_ID: "24379000000000001"
FEATURES: {featured_help_links: true, lti_platform_storage: true, ...}
FULLCALENDAR_LOCALE: "en"
FULL_STORY_ENABLED: false
K5_HOMEROOM_COURSE: false
K5_SUBJECT_COURSE: false
K5_USER: false
LOCALE: "en"
LOCALES: ['en']
LOCALE_TRANSLATION_FILE: "/dist/javascripts/translations/en-88841"
LTI_LAUNCH_FRAME_ALLOWANCES: (8) ['geolocation*', 'microphone*', …]
MOMENT_LOCALE: "en"
RAILS_ENVIRONMENT: "Production"
SENTRY_FRONTEND: {dsn: "https://355a1d96712e4038ac25aa852fa79a8f8"}
SETTINGS: {open_registration: false, collapse_global_nav: false, …}
TIMEZONE: "America/Los_Angeles"
USE_CLASSIC_FONT: false
account_id: "1"
active_brand_config: {md5: "ce87aff671f275c7fa8b620dea9768b", ...}
active_brand_config_json_url: "https://dul1hjcxv0uqb.cloudfront.net/dist/brand..."
active_context_tab: "brand_configs"
allowGlobalIncludes: true
```
The Instance makes use of the
* `current_user` property
```
current_user:
anonymous_id: "32"
avatar_image_url: "https://praxis-ai.instructure.com/images/ display_name: "Hugo Lebegue"
email: "hugo@praxis-ai.com"
html_url: "https://praxis-ai.instructure.com/about/110"
id: "110"
```
* `current_user_roles` property:
```
current_user_roles: Array(5)
0: "user"
1: "student"
2: "teacher"
3: "admin"
4: "root_admin"
```
* `current_context` property:
```
current_context: id: "213"
name: "Hugo"
type: "Course"
url: "https://praxis-ai.instructure.com/courses/213'
```
## Install the Instance SDK into Theme
Once you have customized your SDK Javascript file and added the logic to load the Instance when the proper conditions are met, you are ready to add it to your current Theme
* In the Theme Editor, Upload Tab, under the JavaScript File section, click on the Select button
* Select the pria-sdk-canvas.js that you just customized from your download folder, then click OK
* The theme Editor will download the Javascript onto Canvas content delivery network so it becomes available to the theme.
* Click on the Preview Your Changes button
* Verify that the Instance is running properly in Preview mode
* The Instance Icon should appear at the bottom of the screen in preview mode
* The Instance UI should open and connect upon click on the icon
* If the Instance appears properly in Preview mode, click the Save to apply the changes in the Theme and return to the Theme selector.
* The Instance Icon should display properly
* Congratulations, the Instance is now installed in your theme.
* To verify, login using a standard User account, and navigate to the section of Canvas where you are loading the Instance, example below in a course
## Subaccounts
Canvas allows administrators to set up themes for sub accounts. Use this technique to enable Praxis AI in a Theme for specific user population/courses.
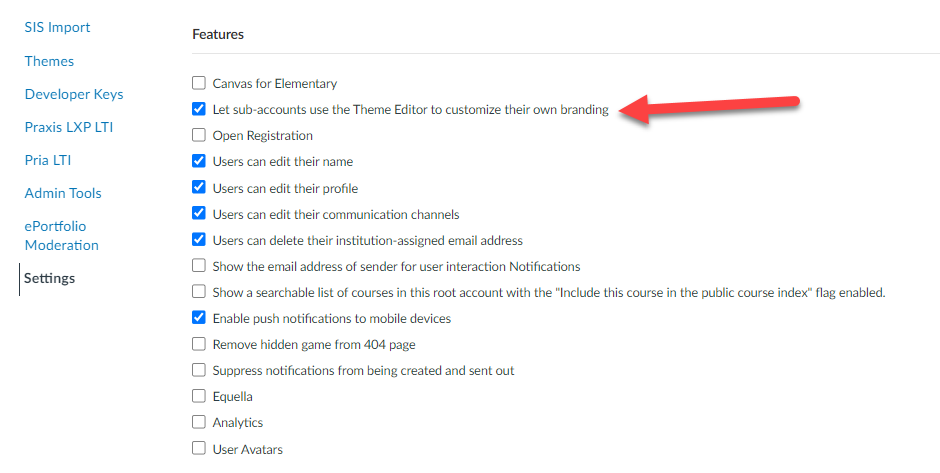 It is best practice to add Praxis AI only to sub accounts, because scripts are added from Parent to Child domains.
## Teacher Onboarding
This process happens IF you decide to leave the `INSTITUTION_ID` field as an empty string (by default) in the SDK file inserted in the theme.
The teacher (or any administrator) is then expected to Create an instance of Pria (a.k.a. Instance), or connect to an existing one for every course the teacher wants Pria in.
When inserted as a theme, Pria is injected in the bottom right corner of a course page.
## Create your Digital Twin
* The onboarding wizard starts when the Teacher clicks on Pria's icon to expand for the first time
* This wizard allows for the creation of an instance of Pria, dedicated to the teacher.
It is best practice to add Praxis AI only to sub accounts, because scripts are added from Parent to Child domains.
## Teacher Onboarding
This process happens IF you decide to leave the `INSTITUTION_ID` field as an empty string (by default) in the SDK file inserted in the theme.
The teacher (or any administrator) is then expected to Create an instance of Pria (a.k.a. Instance), or connect to an existing one for every course the teacher wants Pria in.
When inserted as a theme, Pria is injected in the bottom right corner of a course page.
## Create your Digital Twin
* The onboarding wizard starts when the Teacher clicks on Pria's icon to expand for the first time
* This wizard allows for the creation of an instance of Pria, dedicated to the teacher.
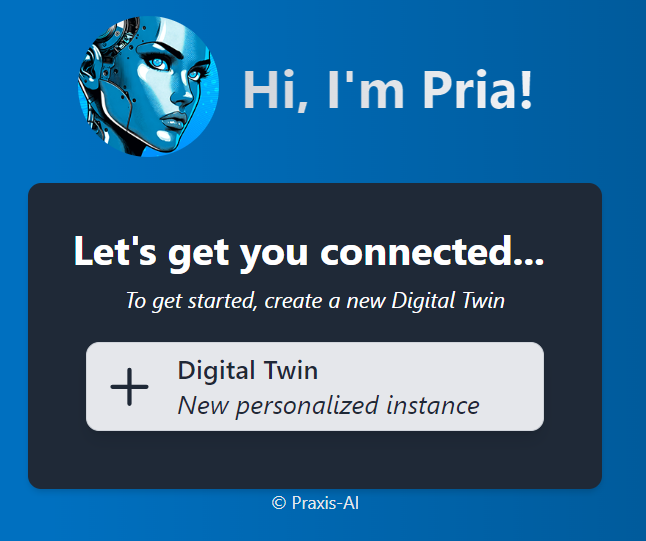 Click the + Digital Twin button to create a personalized instance of Pria.
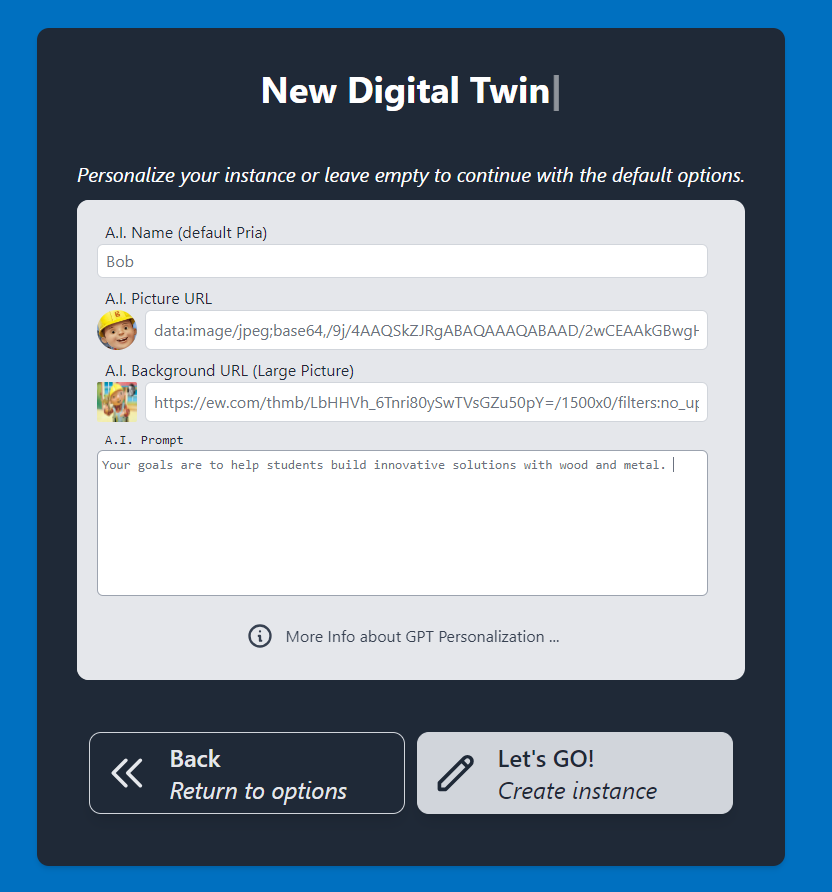 In the New Instance dialog, enter
* a name for your twin, ex: Bob,
* a picture URL that is accessible on the internet (without CORS issues), and
* a picture to use for the ui background
* An A.I. prompt that personalizes your character (more information is available in the Faculty Guide )
Click Let's GO to finish the creation of your new instance.
You are now in your Instance instance: Congratulations, you just created your very first Instance.
In the New Instance dialog, enter
* a name for your twin, ex: Bob,
* a picture URL that is accessible on the internet (without CORS issues), and
* a picture to use for the ui background
* An A.I. prompt that personalizes your character (more information is available in the Faculty Guide )
Click Let's GO to finish the creation of your new instance.
You are now in your Instance instance: Congratulations, you just created your very first Instance.
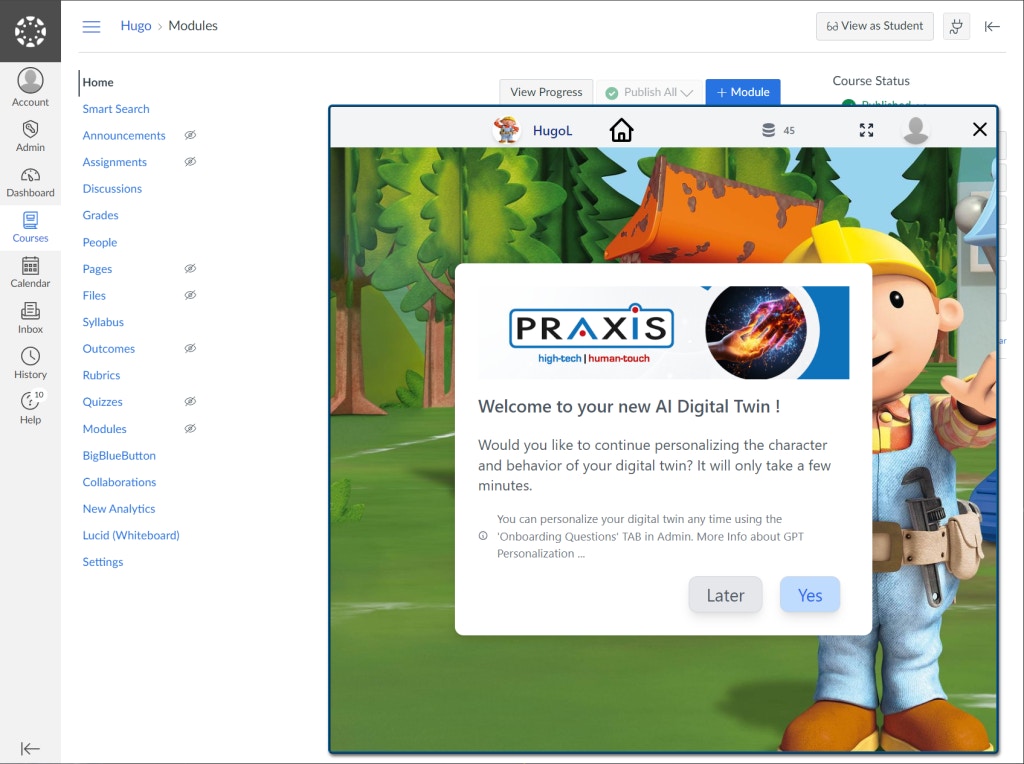 Anytime you or your students will click on Pria in this page, you will access this instance directly.
When you place Pria in another course, it is considered a new placement. You will have to go through this wizard again and create a different instance or reuse one of your existing instances like the example below
Anytime you or your students will click on Pria in this page, you will access this instance directly.
When you place Pria in another course, it is considered a new placement. You will have to go through this wizard again and create a different instance or reuse one of your existing instances like the example below
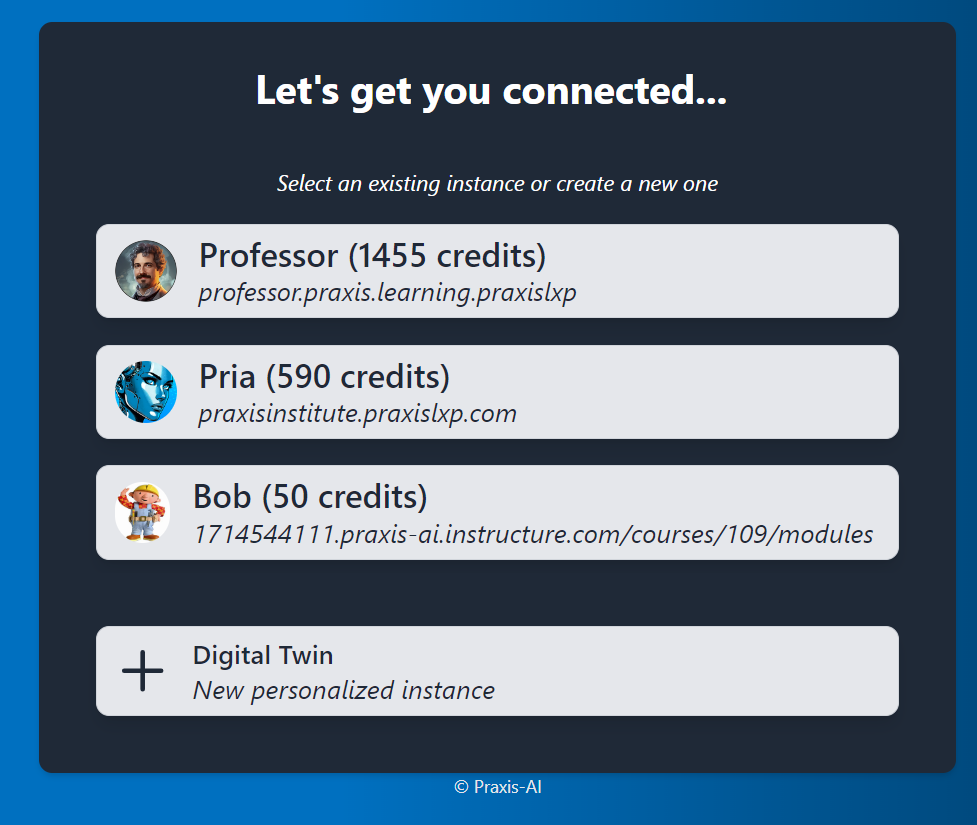 Selecting an existing instance will associate this placement to the instance. This can not be changed later, unless you remove the placement URL from the list of configured URLs for this instance.
## More Personalization Options
More information on Admin functions is available in this documentation.
Once connected to your instance, click on the **Personalization and AI Models** tab. This page is where you can update any personalizations for your instance.
Selecting an existing instance will associate this placement to the instance. This can not be changed later, unless you remove the placement URL from the list of configured URLs for this instance.
## More Personalization Options
More information on Admin functions is available in this documentation.
Once connected to your instance, click on the **Personalization and AI Models** tab. This page is where you can update any personalizations for your instance.
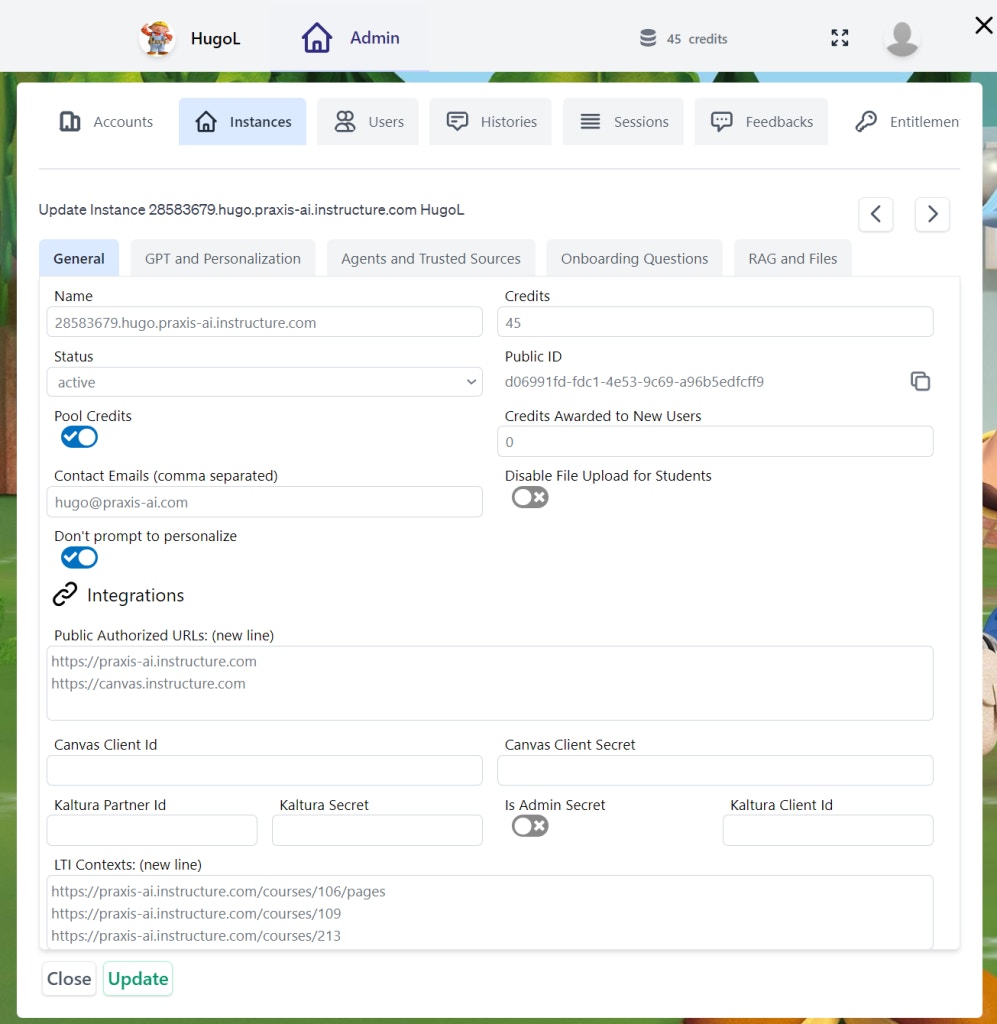 * Follow the instructions in the Admin Guide to setup integration to your Canvas instance and allow Pria to search your course content.
* If you are using Kaltura, this is a good time to configure the integration as well. Contact your IT Administrator
* Anytime you make a change to the instance, don't forget to click the Update button to save your changes.
## Whitelisting
In order for Pria and associated services to run without connectivity issues, the following domains **must** be Whitelisted by your institution:
```
pria.praxislxp.com
prialti.praxislxp.com
```
***
## Troubleshooting
| Issue | Solution |
| ----------------------------------------------- | --------------------------------------------------------------------------------------------------------------------------------------------------------- |
| **Pria button doesn't appear** | Verify the JavaScript file was uploaded to the correct sub-account theme. Check browser console for JS errors. Ensure the theme is published and applied. |
| **Button appears but nothing happens on click** | Check that `INSTITUTION_ID` is set correctly in the SDK. Verify the Digital Twin instance exists and is active. |
| **"Access Denied" or CORS errors** | Ensure `pria.praxislxp.com` and `prialti.praxislxp.com` are whitelisted. Check that your domain is added to the Digital Twin's Authorized Public URLs. |
| **Theme changes not reflecting** | Canvas caches theme assets aggressively. Re-upload the modified JS file and publish the theme again. Clear browser cache. |
| **Users see wrong Digital Twin** | Verify the `INSTITUTION_ID` in your SDK matches the intended instance. For multi-course setups, ensure each sub-account has the correct configuration. |
| **Onboarding wizard not appearing for faculty** | The wizard only appears for users with Teacher or Admin roles in Canvas. Verify the user's enrollment role. |
Use your browser's Developer Tools (F12) → Console tab to identify JavaScript errors. Most issues stem from incorrect `INSTITUTION_ID` values or missing whitelist entries.
***
## What's Next?
Extend your integration with widgets, context menus, and UI enhancements.
Let your Digital Twin interact with Canvas APIs for course-aware assistance.
* Follow the instructions in the Admin Guide to setup integration to your Canvas instance and allow Pria to search your course content.
* If you are using Kaltura, this is a good time to configure the integration as well. Contact your IT Administrator
* Anytime you make a change to the instance, don't forget to click the Update button to save your changes.
## Whitelisting
In order for Pria and associated services to run without connectivity issues, the following domains **must** be Whitelisted by your institution:
```
pria.praxislxp.com
prialti.praxislxp.com
```
***
## Troubleshooting
| Issue | Solution |
| ----------------------------------------------- | --------------------------------------------------------------------------------------------------------------------------------------------------------- |
| **Pria button doesn't appear** | Verify the JavaScript file was uploaded to the correct sub-account theme. Check browser console for JS errors. Ensure the theme is published and applied. |
| **Button appears but nothing happens on click** | Check that `INSTITUTION_ID` is set correctly in the SDK. Verify the Digital Twin instance exists and is active. |
| **"Access Denied" or CORS errors** | Ensure `pria.praxislxp.com` and `prialti.praxislxp.com` are whitelisted. Check that your domain is added to the Digital Twin's Authorized Public URLs. |
| **Theme changes not reflecting** | Canvas caches theme assets aggressively. Re-upload the modified JS file and publish the theme again. Clear browser cache. |
| **Users see wrong Digital Twin** | Verify the `INSTITUTION_ID` in your SDK matches the intended instance. For multi-course setups, ensure each sub-account has the correct configuration. |
| **Onboarding wizard not appearing for faculty** | The wizard only appears for users with Teacher or Admin roles in Canvas. Verify the user's enrollment role. |
Use your browser's Developer Tools (F12) → Console tab to identify JavaScript errors. Most issues stem from incorrect `INSTITUTION_ID` values or missing whitelist entries.
***
## What's Next?
Extend your integration with widgets, context menus, and UI enhancements.
Let your Digital Twin interact with Canvas APIs for course-aware assistance.