> ## Documentation Index
> Fetch the complete documentation index at: https://docs.praxis-ai.com/llms.txt
> Use this file to discover all available pages before exploring further.
# Embed your Digital Twin
> Embed your Digital Twin in any Web application using the Web SDK.
## Fastest path: the Integration Wizard
The quickest way to embed your Digital Twin is the built-in **Integration Wizard** — a visual configurator that generates ready-to-use embed code for you. You pick where the twin will run, configure how the widget looks and behaves with a live preview, then copy or download the finished file. No hand-editing of SDK templates required.
The wizard replaces the old copy-and-edit-a-template workflow for most integrations. The manual [Installation](#installation), [Integration](#integration), and [Configuration](#configuration) steps below are still fully supported for when you want complete control or to understand what the generated code does.
### Where to find it
Open your Digital Twin's **Instance Settings** and select the **Integration** tab. The wizard is preset to the current twin, so you go straight to choosing a target.
Admins can open the wizard from the **Integration** button on the Instances list and pick which Digital Twin to generate code for.
From your Digital Twin, open the **+** options menu in the message bar, choose **Settings**, then **Instance**:


 ### How it works
From the admin Instances list, select the twin to embed. (Skipped when you launch from Instance Settings — it uses the current twin.) The wizard warns you if the twin has no picture, since the widget button would otherwise show Pria's default logo.
On the **Integration** tab, choose where the twin will run:
| Target | Generates |
| ------------------------------ | ---------------------------------------------------------------------------------------- |
| **Web page (JavaScript)** | A single script for any website — loads on page ready, or wires up your own button. |
| **React component** | A drop-in `` with mount/unmount lifecycle handled. |
| **Python-served page (Flask)** | A minimal Flask app serving a page with the widget pre-configured. |
| **Canvas LMS theme** | Custom JavaScript for your Canvas theme — every course page gets the twin. |
| **Claude (LLM instructions)** | A drop-in `CLAUDE.md` that teaches Claude to drive the twin through the REST API. |
| **Avatar widget** | The two-tag [talking-avatar embed](/mdx/integrations/web/avatar-widget) for any website. |
### How it works
From the admin Instances list, select the twin to embed. (Skipped when you launch from Instance Settings — it uses the current twin.) The wizard warns you if the twin has no picture, since the widget button would otherwise show Pria's default logo.
On the **Integration** tab, choose where the twin will run:
| Target | Generates |
| ------------------------------ | ---------------------------------------------------------------------------------------- |
| **Web page (JavaScript)** | A single script for any website — loads on page ready, or wires up your own button. |
| **React component** | A drop-in `` with mount/unmount lifecycle handled. |
| **Python-served page (Flask)** | A minimal Flask app serving a page with the widget pre-configured. |
| **Canvas LMS theme** | Custom JavaScript for your Canvas theme — every course page gets the twin. |
| **Claude (LLM instructions)** | A drop-in `CLAUDE.md` that teaches Claude to drive the twin through the REST API. |
| **Avatar widget** | The two-tag [talking-avatar embed](/mdx/integrations/web/avatar-widget) for any website. |
 Use the visual configurator (with a live preview) to set the button position, button size, and toggles such as **full screen**, **open on load**, and **Start in Convo mode** (voice). An **Advanced** section exposes options like `allowPop`, `noUI`, and custom container IDs.
 Preview the generated file, then **copy it to your clipboard** or **download it**. Paste it into your site — it works as-is.
 ### Visitor identity
The wizard offers a **Visitor mode** toggle that decides how users are identified:
* **On (default):** the generated code gives each visitor a reusable guest identity — no sign-in required, and dormant guests are cleaned up automatically. Ideal for public, anonymous embeds.
* **Off:** the code exposes a seam for your own sign-in, so you can pass real user identity (email, name, course, etc.) from your application.
Prefer to hand-code your integration, or want to understand exactly what the wizard produces? Keep reading — the sections below walk through installing the SDK and configuring it manually.
***
## Integration Process
The integration process is straightforward:
* Download and install the Web SDK,
* Choose between Limited or Standard Integration
* Further configure your integration (digital twin, user identity, display options)
Looking for a **voice avatar** instead of the full chat UI? The [Avatar Embed Widget](/mdx/integrations/web/avatar-widget) puts your Digital Twin's talking avatar on any website with a single script tag — visitors converse with it anonymously, no user identity required.
Download the Web SDK and install the Javascript file in your website.
Choose between limited or standard integration option to integrate into your website.
Customize the setup to specify which Digital Twin to connect to, User Identity and various display options.
***
## Prerequisites
Before you begin, ensure you have:
* [ ] **Web development access** to your target website or application
* [ ] **A Praxis AI Digital Twin** instance created at [pria.praxislxp.com](https://pria.praxislxp.com)
* [ ] **Your Digital Twin's public instance ID** (found in Configuration & Integrations)
* [ ] **HTTPS enabled** on your website (required for secure SDK communication)
* [ ] For public Digital Twins: Your domain added to **Authorized Public URLs** in the Digital Twin settings
**Estimated setup time:** 10-15 minutes for Limited Integration, 30+ minutes for Standard Integration with custom logic.
***
## Installation
Download the Pria Web SDK file and save it locally on your website under the name `pria-sdk-web.js`
```
https://pria.praxislxp.com/pria-sdk-web.js
```
This SDK provides all routines for secure initialization and integration with your Digital Twin in a web application.
For Canvas LMS integration, refer to [Custom Theme Canvas Install Guide](/mdx/integrations/canvas/theme)
**Public Digital Twin Security Considerations**
When making a Digital Twin publicly accessible (without user authentication), you must take the following precautions:
1. **Credit Management**
* Set the Digital Twin to **"Do Not Pool Credits"** to prevent shared credit exploitation
* Configure a reasonable credit allocation (e.g., 50 credits) for new guest registrations
* Enable the **Guest UI** mode for anonymous access
* Disable **Use Location** to prevent unwanted pop-ups
2. **Access Control**
* Add your domain (e.g., `https://your-domain.com`) to the list of **Authorized Public URLs**
* Only domains in this whitelist will be able to embed and access the Digital Twin
3. **Tool Restrictions**
* Disable tools that could be exploited: `call_rest`, `send_email`, `call_canvas`, `save_to_file`, etc.
* This reduces token usage and prevents malicious use of system capabilities
4. **Prompt Engineering**
* Carefully craft your system prompt to keep conversations on-topic
* Include guardrails to prevent users from repurposing the Digital Twin for unrelated queries
Public-facing Digital Twins are inherently more vulnerable to abuse. Users may attempt to exploit the credit system or use the AI for purposes beyond its intended scope.
## Integration
You can choose Limited or Standard Integration based on your JavaScript skill level and requirements.
Start your Digital Twin with minimal effort, leveraging the UI without programming.
Integrate your Digital Twin securely with JavaScript code and take full control.
### Limited Integration
Embed the Digital Twin UI in your website header with:
```html theme={null}
```
The `pria-sdk-web.js` file is the SDK you downloaded. Optionally, place this in a directory, e.g., `/assets/js/pria-sdk-web.js`.
Basic initialization for DOM-ready load:
```javascript theme={null}
window.addEventListener('DOMContentLoaded', (event) => {
// loading logic
})
```
Adjust parameters in the SDK for your Digital Twin, user identity, and display preferences:
```javascript theme={null}
const instanceConfig = {
publicId: 'f831501f-b645-481a-9cbb-331509aaf8c1',
pictureUrl: 'https://cdn.domain.com/pics/dt_1.png'
}
const userConfig = {
email: `john@doe.com`,
profilename: `John Doe`,
}
const displayOptions= {
buttonPositionRight: 'calc(50% - 40px)',
buttonPositionBottom: '80px'
}
PriaIntegration.loadSdk('https://pria.praxislxp.com', displayOptions, instanceConfig, userConfig);
```
For security, retrieve these values from a secure, asynchronous source to avoid exposing sensitive data.
### Integration Starter Kit
Download the [Example Starter Kit](https://pria.praxislxp.com/integration-samples.zip) to get started with two ready-to-use integration examples.
Easy Setup Text interface: Use the helper class for quick setup with minimal code.
Intialize and start Convo Mode: Load the SDK directly for full control over events and behavior.
#### Integration Sample (integration-sample.html)
This example demonstrates using the `PriaIntegration` class from `pria-sdk-web.js` for a streamlined integration:
```javascript theme={null}
// Load SDK with PriaIntegration helper class
PriaIntegration.loadSdk(baseUrl, displayOptions, instanceConfig, userConfig);
// Wait for SDK to be ready
const timer = setInterval(() => {
if (window.pria && window.pria.isReady && window.pria.isReady()) {
clearInterval(timer);
// SDK is ready - user can interact with the button
}
}, 100);
// Clean termination
PriaIntegration.destroySdk();
```
**Best for:** Quick integrations where you want the Digital Twin button to appear and let users click to start conversations naturally.
#### SDK Sample (sdk-sample.html)
This example loads the remote `pria-sdk.js` directly, giving you full control over events and conversation flow:
```javascript theme={null}
// Load SDK script directly
const script = document.createElement('script');
script.src = `${BASE_URL}/pria-sdk.js`;
script.onload = () => {
window.priasdk(BASE_URL, userConfig, PUBLIC_ID, pictureUrl, displayOptions);
waitForReady(setupPria);
};
// Subscribe to events for granular control
window.pria.subscribe((response) => {
const command = response?.response?.command;
if (response.type === 'pria-response' && command === 'convo.start') {
// Conversation started - show the UI
window.pria.setVisible(true);
}
});
// Programmatically start conversation
window.pria.send({ command: 'convo.start' });
```
**Best for:** Advanced integrations requiring:
* Custom loading indicators while connecting
* Automatic conversation start on button click
* Error handling with retry logic
* Visibility control based on connection state
The SDK Sample hides the Digital Twin UI until the conversation is confirmed started, providing a smoother user experience with loading feedback.
### Standard Integration
For full control, use JavaScript to configure and load the SDK.
Configuration object example:
```javascript theme={null}
// Configuration
let config = {
displayOptions: {
buttonPositionRight: 'calc(50% - 40px)',
buttonPositionBottom: '80px'
},
instanceConfig: {
publicId: 'f831501f-b645-481a-9cbb-331509aaf8c1',
pictureUrl: 'https://cdn.domain.com/pics/dt_1.png'
},
userConfig: {
email: 'john@doe.com',
profilename: 'John Doe',
usertype: 1,
userid: 110,
roleid: 123,
rolename: "Course ABC",
partnerid: 1,
partnername: "ABC Global Inc."
},
... other useful configuration objects
};
```
This object configures display, digital twin instance, and user identity.
Load the SDK:
```javascript theme={null}
/**
* Load the Pria SDK
*/
loadPriaSDK() {
return new Promise((resolve, reject) => {
const script = document.createElement('script');
script.src = 'pria-sdk-web.js';
script.async = true;
script.onload = () => {
PriaIntegration.loadSdk(
'https://pria.praxislxp.com',
config.displayOptions,
config.instanceConfig,
config.userConfig
);
resolve();
};
script.onerror = (error) => {
reject(new Error('Web SDK loading failed'));
};
document.body.appendChild(script);
});
}
// usage
await loadPriaSDK();
```
The SDK file should be the copy you installed. You can organize includes under `/assets/js/` as needed.
For a full example, see [SDK Playground Example](/mdx/sdk/javascript#sdk-playground).
## Configuration Parameters
The SDK requires three objects: `displayOptions`, `instanceConfig`, and `userConfig`.
### Display Options
The `displayOptions` object controls the display and behavior of your digital twin on screen.
```javascript theme={null}
let displayOptions = {
fullScreen: false, // Expand in full screen mode
openOnLoad: false, // Open Pria immediately when loaded
buttonWidth: '80px', // Size of the Pria logo button
buttonPosition: 'fixed', // Button position type (fixed, relative, sticky)
buttonPositionRight: '20px', // Distance from right edge
buttonPositionBottom: '20px', // Distance from bottom edge
buttonNoBounce: true, // Disable button bounce animation
priaContainerId: '', // Container ID for Pria window (default: BODY)
buttonContainerId: '', // Container ID for button (default: BODY)
allowPop: false, // Allow popping out of containing iframe
noUI: false, // Disable UI for headless operation
convoMode: false // Auto-start convo (voice) mode when ready
}
```
Set `noUI: true` to use Pria programmatically without the visual interface
Adjust `buttonPositionRight` with CSS for positioning, e.g., `calc(50% - 40px)` for center alignment.
### Convo Mode (`convoMode`)
The `convoMode` display option lets you auto-start real-time voice (speech-to-speech) mode as soon as the Digital Twin determines that voice is available for the current user. This is useful when you want your application to launch directly into a voice experience without requiring the user to navigate through the text interface first.
**How it works:** After the user authenticates, the SDK receives a `convo.ready` event from the Digital Twin indicating whether real-time voice is authorized. When `convoMode` is enabled, the SDK automatically sends a `convo.start` command and opens the UI panel.
**Values:**
| Value | Behavior |
| --------------------------------------------------- | -------------------------------------------------------------------------------------------------- |
| `false` (default) | No auto-start. Voice mode must be started manually. |
| `true` | Auto-start voice mode with the default assistant in a new conversation. |
| `{ conversationId, conversationName, assistantId }` | Auto-start voice mode targeting a specific conversation and/or assistant. All fields are optional. |
**Simple auto-start:**
```javascript theme={null}
let displayOptions = {
convoMode: true,
fullScreen: true,
openOnLoad: true
}
```
**Targeted auto-start with a specific assistant and conversation:**
```javascript theme={null}
let displayOptions = {
convoMode: {
conversationId: 123, // maps to course_id
conversationName: 'Customer Onboarding', // maps to course_name
assistantId: '6bec24be-4e86-4071-b90f-d588' // target assistant _id
},
fullScreen: true,
openOnLoad: true
}
```
`convoMode` requires that real-time voice (convo) is enabled for the user's institution. If voice is not authorized, the flag is silently ignored and the text interface loads normally.
### Instance Configuration
The `instanceConfig` object configure which Digital Twin to use along with the picture rendered in the start button.
```javascript theme={null}
let instanceConfig = {
publicId: '41407647-248c-4f0e-a317-71fc151ba8fb', // Public ID identifying your Digital Twin
pictureUrl: 'https://cdn.domain.com/pics/dt_1.png', // Picture to use for the on-screen icon of your Digital Twin
};
```
The publicId identifies your digital twin instance
Load these values securely and asynchronously—never expose sensitive data in your HTML.
### User identity
Set the user identity in the `userConfig` object
```javascript theme={null}
let userConfig = {
email: 'john@doe.com', // Required
profilename: 'John Doe',
profilepicture: '', // Leave empty for user's default picture
userid: '123', // Optional user identifier on your site
roleid: 123, // Optional conversation/course ID
rolename: 'Course ABC', // Optional conversation/course name
partnerid: 1, // Optional customer/account ID
partnername: 'ABC Global Inc.' // Optional customer/account name
};
```
The `email` is required and serves as the main identifier in Praxis AI Middleware.
For education, set `roleid` and `rolename` to specify the course.
Use `partnerid` and `partnername` to identify an Account or Customer when you create a multi tenant solution
For enhanced security, always retrieve these values asynchronously from a secure source to prevent exposure of plaintext data in the page.
### Wait for Pria and Start Convo mode
Here is an example demonstrating how to Wait for Pria to be fully ready, then start Convo mode
```javascript theme={null}
/**
* Start a conversation with optional assistant and course selection
*/
const startConversation = async (assistantId, conversationId, conversationName) => {
let request = {
command: 'convo.start'
};
// Optionally specify an assistant
if (assistantId) {
request.assistantId = assistantId;
}
// Optionally specify an existing conversation
if (conversationId && conversationName) {
request.selectedCourse = {
course_id: conversationId,
course_name: conversationName
};
}
console.log("Starting convo mode");
window.pria.send(request);
}
/**
* Handle responses from Pria
*/
const handleResponse = async (data) => {
console.log("Got response from Pria", data);
const command = data?.response?.command;
const content = data?.response?.content;
if (data.type === 'pria-response') {
console.log("Processing command:", command);
// Handle convo.start success - show UI
if (command === 'convo.start') {
// Use SDK's display function to show the UI panel
window.pria.display(true);
}
else if (command === 'assistants.list' && content) {
// Handle assistants list response
console.log("Assistants loaded:", content);
}
else if (command === 'conversations.list' && content) {
// Handle conversations list response
console.log("Conversations loaded:", content);
}
}
else if (data.type === 'pria-error') {
const errorContent = data?.response?.content;
if (errorContent && errorContent.indexOf("not connected") > -1) {
// Retry after delay if not connected
setTimeout(() => startConversation(), 2000);
} else {
console.error("Pria error:", errorContent);
}
}
}
/**
* Wait for Pria to be fully loaded and ready
*/
const waitForPria = () => {
// Use isReady to check if Pria is fully initialized
if (!window?.pria?.isReady()) {
console.log("Waiting for Pria to load...");
return;
}
console.log('Pria loaded and ready');
clearInterval(waitForPriaTimer);
// Subscribe to Pria responses
window.pria.subscribe(handleResponse);
// Start conversation after a brief delay
setTimeout(() => startConversation(), 2000);
// Clean up on page unload
window.addEventListener('beforeunload', () => {
window.pria.unsubscribe(handleResponse);
window.pria.destroy(); // Clean up Pria resources
});
}
let waitForPriaTimer = setInterval(waitForPria, 1000);
```
Use `window.pria.isReady()` to check if Pria is fully initialized before sending commands.
## Integration Class Sample
This example is provided AS IS to demonstrate how you can cleanly integrate a Digital Twin in your Web Application. It is extracted from the playground example code.
```javascript theme={null}
/**
* Javascript Class integration example
* Demonstrates modern patterns for Pria SDK integration
*/
class PriaTestHarness {
constructor() {
this.pria = null;
this.waitForPriaTimer = null;
this.isConnected = false;
this.conversationMode = 'existing'; // 'existing' or 'new'
this.assistantsCache = []; // Cache assistants for lookup
// Configuration
this.config = {
displayOptions: {
buttonPositionRight: 'calc(50% - 40px)',
buttonPositionBottom: '80px'
},
instanceConfig: {
publicId: 'f831501f-b645-481a-9cbb-331509aaf8c1',
pictureUrl: 'https://cdn.domain.com/pics/dt_1.png'
},
userConfig: {
email: 'john@doe.com',
profilename: 'John Doe',
usertype: 1,
userid: 110,
roleid: 123,
rolename: "Course ABC",
partnerid: 1,
partnername: "ABC Global Inc."
},
localhost: true
};
this.init();
}
/**
* Initialize the application
*/
async init() {
try {
await this.loadPriaSDK();
}
catch (error) {
console.error('Failed to initialize application:', error);
}
}
/**
* Load the Pria SDK
*/
loadPriaSDK() {
return new Promise((resolve, reject) => {
const script = document.createElement('script');
script.src = 'pria-sdk-web.js';
script.async = true;
script.onload = () => {
console.log('Web SDK Script loaded');
const url = 'https://pria.praxislxp.com';
PriaIntegration.loadSdk(
url,
this.config.displayOptions,
this.config.instanceConfig,
this.config.userConfig
);
this.waitForPriaTimer = setInterval(() => this.waitForPria(), 1000);
resolve();
};
script.onerror = (error) => {
console.error('Failed to load Web SDK:', error);
reject(new Error('Web SDK loading failed'));
};
document.body.appendChild(script);
});
}
/**
* Wait for Pria to be available and set up subscriptions
*/
waitForPria() {
// Use isReady() to check if Pria is fully initialized
if (!window.pria?.isReady()) {
console.log("Waiting for Pria to load...");
return;
}
clearInterval(this.waitForPriaTimer);
this.pria = window.pria;
this.isConnected = true;
// Subscribe to Pria responses
this.pria.subscribe(this.handlePriaResponse.bind(this));
// Load assistants and conversations on connection
this.loadAssistants();
this.loadConversations();
// Clean up on page unload
window.addEventListener('beforeunload', () => {
this.pria.unsubscribe(this.handlePriaResponse);
this.pria.destroy(); // Clean up Pria resources
});
}
/**
* Handle responses from Pria
*/
handlePriaResponse(response) {
const command = response?.response?.command;
const content = response?.response?.content;
if (response.type === 'pria-response') {
console.log("Processing command:", command);
// Handle convo.start success - show UI
if (command === 'convo.start') {
this.showPria();
}
else if (command === 'assistants.list' && content) {
this.assistantsCache = content;
console.log("Assistants loaded:", content.length);
}
else if (command === 'conversations.list' && content) {
console.log("Conversations loaded:", content.length);
}
}
else if (response.type === 'pria-error') {
console.error("Pria error:", content);
}
}
/**
* Start a conversation
*/
startConversation(assistantId, conversationId, conversationName) {
if (!this.isConnected) return;
let request = { command: 'convo.start' };
if (assistantId) {
request.assistantId = assistantId;
}
if (conversationId && conversationName) {
request.selectedCourse = {
course_id: conversationId,
course_name: conversationName
};
}
this.pria.send(request);
}
/**
* Load assistants list
*/
loadAssistants() {
if (!this.isConnected) return;
this.pria.send({ command: 'assistants.list' });
}
/**
* Load conversations list
*/
loadConversations() {
if (!this.isConnected) return;
this.pria.send({ command: 'conversations.list' });
}
/**
* Toggle Pria visibility (show/hide entirely)
*/
togglePriaVisibility(visible) {
if (!this.isConnected) return;
this.pria.setVisible(visible);
}
/**
* Toggle Pria panel display (expand/collapse)
*/
togglePriaDisplay() {
if (!this.isConnected) return;
// Use SDK's isDisplayed() to check current state
const isCurrentlyDisplayed = this.pria.isDisplayed();
this.pria.display(!isCurrentlyDisplayed);
}
/**
* Show Pria interface
*/
showPria() {
if (!this.pria) return;
// Check if UI is already shown using SDK's isDisplayed()
if (!this.pria.isDisplayed()) {
this.pria.display(true);
}
}
}
// Initialize the application when DOM is loaded
document.addEventListener('DOMContentLoaded', () => {
new PriaTestHarness();
});
```
### Key SDK Methods Used
| Method | Description |
| ---------------------------- | ---------------------------------------------------------------- |
| `pria.isReady()` | Check if Pria is fully initialized and ready to receive commands |
| `pria.subscribe(callback)` | Listen for responses from Pria |
| `pria.unsubscribe(callback)` | Remove a response listener |
| `pria.send(request)` | Send a command to Pria |
| `pria.setVisible(visible)` | Show or hide Pria entirely (removes from DOM view) |
| `pria.isVisible()` | Check if Pria is currently visible |
| `pria.display(show)` | Expand or collapse the Pria UI panel |
| `pria.isDisplayed()` | Check if the UI panel is currently expanded |
| `pria.destroy()` | Clean up and remove Pria from the page |
### Checking Ready State
Always verify Pria is ready before sending commands:
```javascript theme={null}
/**
* Check if Pria SDK is ready to receive messages
* @returns {boolean} True if SDK is fully connected and ready
*/
function isPriaReady() {
return window.pria &&
typeof window.pria.isReady === 'function' &&
window.pria.isReady();
}
// Usage in your application
if (isPriaReady()) {
window.pria.send({ command: 'convo.start' });
}
```
The `isReady()` method returns `true` only when the SDK is fully connected to the middleware and ready to send/receive messages.
### Cleanup and Reload
When you need to remove Pria or reload it with new configuration:
```javascript theme={null}
// Destroy SDK completely (removes all UI, event listeners, and references)
PriaIntegration.destroySdk();
// Reload with new or existing configuration
PriaIntegration.reloadSdk(
'https://pria.praxislxp.com',
displayOptions,
instanceConfig,
userConfig
);
```
After calling `destroy()` or `destroySdk()`, all existing references to `pria` become invalid. The SDK must be fully reloaded before use.
## SDK Playground Example
See a live demo: at [SDK Playground Example](https://pria.praxislxp.com/pria-sdk-web-sample.html).
```
https://pria.praxislxp.com/pria-sdk-web-sample.html
```
### Visitor identity
The wizard offers a **Visitor mode** toggle that decides how users are identified:
* **On (default):** the generated code gives each visitor a reusable guest identity — no sign-in required, and dormant guests are cleaned up automatically. Ideal for public, anonymous embeds.
* **Off:** the code exposes a seam for your own sign-in, so you can pass real user identity (email, name, course, etc.) from your application.
Prefer to hand-code your integration, or want to understand exactly what the wizard produces? Keep reading — the sections below walk through installing the SDK and configuring it manually.
***
## Integration Process
The integration process is straightforward:
* Download and install the Web SDK,
* Choose between Limited or Standard Integration
* Further configure your integration (digital twin, user identity, display options)
Looking for a **voice avatar** instead of the full chat UI? The [Avatar Embed Widget](/mdx/integrations/web/avatar-widget) puts your Digital Twin's talking avatar on any website with a single script tag — visitors converse with it anonymously, no user identity required.
Download the Web SDK and install the Javascript file in your website.
Choose between limited or standard integration option to integrate into your website.
Customize the setup to specify which Digital Twin to connect to, User Identity and various display options.
***
## Prerequisites
Before you begin, ensure you have:
* [ ] **Web development access** to your target website or application
* [ ] **A Praxis AI Digital Twin** instance created at [pria.praxislxp.com](https://pria.praxislxp.com)
* [ ] **Your Digital Twin's public instance ID** (found in Configuration & Integrations)
* [ ] **HTTPS enabled** on your website (required for secure SDK communication)
* [ ] For public Digital Twins: Your domain added to **Authorized Public URLs** in the Digital Twin settings
**Estimated setup time:** 10-15 minutes for Limited Integration, 30+ minutes for Standard Integration with custom logic.
***
## Installation
Download the Pria Web SDK file and save it locally on your website under the name `pria-sdk-web.js`
```
https://pria.praxislxp.com/pria-sdk-web.js
```
This SDK provides all routines for secure initialization and integration with your Digital Twin in a web application.
For Canvas LMS integration, refer to [Custom Theme Canvas Install Guide](/mdx/integrations/canvas/theme)
**Public Digital Twin Security Considerations**
When making a Digital Twin publicly accessible (without user authentication), you must take the following precautions:
1. **Credit Management**
* Set the Digital Twin to **"Do Not Pool Credits"** to prevent shared credit exploitation
* Configure a reasonable credit allocation (e.g., 50 credits) for new guest registrations
* Enable the **Guest UI** mode for anonymous access
* Disable **Use Location** to prevent unwanted pop-ups
2. **Access Control**
* Add your domain (e.g., `https://your-domain.com`) to the list of **Authorized Public URLs**
* Only domains in this whitelist will be able to embed and access the Digital Twin
3. **Tool Restrictions**
* Disable tools that could be exploited: `call_rest`, `send_email`, `call_canvas`, `save_to_file`, etc.
* This reduces token usage and prevents malicious use of system capabilities
4. **Prompt Engineering**
* Carefully craft your system prompt to keep conversations on-topic
* Include guardrails to prevent users from repurposing the Digital Twin for unrelated queries
Public-facing Digital Twins are inherently more vulnerable to abuse. Users may attempt to exploit the credit system or use the AI for purposes beyond its intended scope.
## Integration
You can choose Limited or Standard Integration based on your JavaScript skill level and requirements.
Start your Digital Twin with minimal effort, leveraging the UI without programming.
Integrate your Digital Twin securely with JavaScript code and take full control.
### Limited Integration
Embed the Digital Twin UI in your website header with:
```html theme={null}
```
The `pria-sdk-web.js` file is the SDK you downloaded. Optionally, place this in a directory, e.g., `/assets/js/pria-sdk-web.js`.
Basic initialization for DOM-ready load:
```javascript theme={null}
window.addEventListener('DOMContentLoaded', (event) => {
// loading logic
})
```
Adjust parameters in the SDK for your Digital Twin, user identity, and display preferences:
```javascript theme={null}
const instanceConfig = {
publicId: 'f831501f-b645-481a-9cbb-331509aaf8c1',
pictureUrl: 'https://cdn.domain.com/pics/dt_1.png'
}
const userConfig = {
email: `john@doe.com`,
profilename: `John Doe`,
}
const displayOptions= {
buttonPositionRight: 'calc(50% - 40px)',
buttonPositionBottom: '80px'
}
PriaIntegration.loadSdk('https://pria.praxislxp.com', displayOptions, instanceConfig, userConfig);
```
For security, retrieve these values from a secure, asynchronous source to avoid exposing sensitive data.
### Integration Starter Kit
Download the [Example Starter Kit](https://pria.praxislxp.com/integration-samples.zip) to get started with two ready-to-use integration examples.
Easy Setup Text interface: Use the helper class for quick setup with minimal code.
Intialize and start Convo Mode: Load the SDK directly for full control over events and behavior.
#### Integration Sample (integration-sample.html)
This example demonstrates using the `PriaIntegration` class from `pria-sdk-web.js` for a streamlined integration:
```javascript theme={null}
// Load SDK with PriaIntegration helper class
PriaIntegration.loadSdk(baseUrl, displayOptions, instanceConfig, userConfig);
// Wait for SDK to be ready
const timer = setInterval(() => {
if (window.pria && window.pria.isReady && window.pria.isReady()) {
clearInterval(timer);
// SDK is ready - user can interact with the button
}
}, 100);
// Clean termination
PriaIntegration.destroySdk();
```
**Best for:** Quick integrations where you want the Digital Twin button to appear and let users click to start conversations naturally.
#### SDK Sample (sdk-sample.html)
This example loads the remote `pria-sdk.js` directly, giving you full control over events and conversation flow:
```javascript theme={null}
// Load SDK script directly
const script = document.createElement('script');
script.src = `${BASE_URL}/pria-sdk.js`;
script.onload = () => {
window.priasdk(BASE_URL, userConfig, PUBLIC_ID, pictureUrl, displayOptions);
waitForReady(setupPria);
};
// Subscribe to events for granular control
window.pria.subscribe((response) => {
const command = response?.response?.command;
if (response.type === 'pria-response' && command === 'convo.start') {
// Conversation started - show the UI
window.pria.setVisible(true);
}
});
// Programmatically start conversation
window.pria.send({ command: 'convo.start' });
```
**Best for:** Advanced integrations requiring:
* Custom loading indicators while connecting
* Automatic conversation start on button click
* Error handling with retry logic
* Visibility control based on connection state
The SDK Sample hides the Digital Twin UI until the conversation is confirmed started, providing a smoother user experience with loading feedback.
### Standard Integration
For full control, use JavaScript to configure and load the SDK.
Configuration object example:
```javascript theme={null}
// Configuration
let config = {
displayOptions: {
buttonPositionRight: 'calc(50% - 40px)',
buttonPositionBottom: '80px'
},
instanceConfig: {
publicId: 'f831501f-b645-481a-9cbb-331509aaf8c1',
pictureUrl: 'https://cdn.domain.com/pics/dt_1.png'
},
userConfig: {
email: 'john@doe.com',
profilename: 'John Doe',
usertype: 1,
userid: 110,
roleid: 123,
rolename: "Course ABC",
partnerid: 1,
partnername: "ABC Global Inc."
},
... other useful configuration objects
};
```
This object configures display, digital twin instance, and user identity.
Load the SDK:
```javascript theme={null}
/**
* Load the Pria SDK
*/
loadPriaSDK() {
return new Promise((resolve, reject) => {
const script = document.createElement('script');
script.src = 'pria-sdk-web.js';
script.async = true;
script.onload = () => {
PriaIntegration.loadSdk(
'https://pria.praxislxp.com',
config.displayOptions,
config.instanceConfig,
config.userConfig
);
resolve();
};
script.onerror = (error) => {
reject(new Error('Web SDK loading failed'));
};
document.body.appendChild(script);
});
}
// usage
await loadPriaSDK();
```
The SDK file should be the copy you installed. You can organize includes under `/assets/js/` as needed.
For a full example, see [SDK Playground Example](/mdx/sdk/javascript#sdk-playground).
## Configuration Parameters
The SDK requires three objects: `displayOptions`, `instanceConfig`, and `userConfig`.
### Display Options
The `displayOptions` object controls the display and behavior of your digital twin on screen.
```javascript theme={null}
let displayOptions = {
fullScreen: false, // Expand in full screen mode
openOnLoad: false, // Open Pria immediately when loaded
buttonWidth: '80px', // Size of the Pria logo button
buttonPosition: 'fixed', // Button position type (fixed, relative, sticky)
buttonPositionRight: '20px', // Distance from right edge
buttonPositionBottom: '20px', // Distance from bottom edge
buttonNoBounce: true, // Disable button bounce animation
priaContainerId: '', // Container ID for Pria window (default: BODY)
buttonContainerId: '', // Container ID for button (default: BODY)
allowPop: false, // Allow popping out of containing iframe
noUI: false, // Disable UI for headless operation
convoMode: false // Auto-start convo (voice) mode when ready
}
```
Set `noUI: true` to use Pria programmatically without the visual interface
Adjust `buttonPositionRight` with CSS for positioning, e.g., `calc(50% - 40px)` for center alignment.
### Convo Mode (`convoMode`)
The `convoMode` display option lets you auto-start real-time voice (speech-to-speech) mode as soon as the Digital Twin determines that voice is available for the current user. This is useful when you want your application to launch directly into a voice experience without requiring the user to navigate through the text interface first.
**How it works:** After the user authenticates, the SDK receives a `convo.ready` event from the Digital Twin indicating whether real-time voice is authorized. When `convoMode` is enabled, the SDK automatically sends a `convo.start` command and opens the UI panel.
**Values:**
| Value | Behavior |
| --------------------------------------------------- | -------------------------------------------------------------------------------------------------- |
| `false` (default) | No auto-start. Voice mode must be started manually. |
| `true` | Auto-start voice mode with the default assistant in a new conversation. |
| `{ conversationId, conversationName, assistantId }` | Auto-start voice mode targeting a specific conversation and/or assistant. All fields are optional. |
**Simple auto-start:**
```javascript theme={null}
let displayOptions = {
convoMode: true,
fullScreen: true,
openOnLoad: true
}
```
**Targeted auto-start with a specific assistant and conversation:**
```javascript theme={null}
let displayOptions = {
convoMode: {
conversationId: 123, // maps to course_id
conversationName: 'Customer Onboarding', // maps to course_name
assistantId: '6bec24be-4e86-4071-b90f-d588' // target assistant _id
},
fullScreen: true,
openOnLoad: true
}
```
`convoMode` requires that real-time voice (convo) is enabled for the user's institution. If voice is not authorized, the flag is silently ignored and the text interface loads normally.
### Instance Configuration
The `instanceConfig` object configure which Digital Twin to use along with the picture rendered in the start button.
```javascript theme={null}
let instanceConfig = {
publicId: '41407647-248c-4f0e-a317-71fc151ba8fb', // Public ID identifying your Digital Twin
pictureUrl: 'https://cdn.domain.com/pics/dt_1.png', // Picture to use for the on-screen icon of your Digital Twin
};
```
The publicId identifies your digital twin instance
Load these values securely and asynchronously—never expose sensitive data in your HTML.
### User identity
Set the user identity in the `userConfig` object
```javascript theme={null}
let userConfig = {
email: 'john@doe.com', // Required
profilename: 'John Doe',
profilepicture: '', // Leave empty for user's default picture
userid: '123', // Optional user identifier on your site
roleid: 123, // Optional conversation/course ID
rolename: 'Course ABC', // Optional conversation/course name
partnerid: 1, // Optional customer/account ID
partnername: 'ABC Global Inc.' // Optional customer/account name
};
```
The `email` is required and serves as the main identifier in Praxis AI Middleware.
For education, set `roleid` and `rolename` to specify the course.
Use `partnerid` and `partnername` to identify an Account or Customer when you create a multi tenant solution
For enhanced security, always retrieve these values asynchronously from a secure source to prevent exposure of plaintext data in the page.
### Wait for Pria and Start Convo mode
Here is an example demonstrating how to Wait for Pria to be fully ready, then start Convo mode
```javascript theme={null}
/**
* Start a conversation with optional assistant and course selection
*/
const startConversation = async (assistantId, conversationId, conversationName) => {
let request = {
command: 'convo.start'
};
// Optionally specify an assistant
if (assistantId) {
request.assistantId = assistantId;
}
// Optionally specify an existing conversation
if (conversationId && conversationName) {
request.selectedCourse = {
course_id: conversationId,
course_name: conversationName
};
}
console.log("Starting convo mode");
window.pria.send(request);
}
/**
* Handle responses from Pria
*/
const handleResponse = async (data) => {
console.log("Got response from Pria", data);
const command = data?.response?.command;
const content = data?.response?.content;
if (data.type === 'pria-response') {
console.log("Processing command:", command);
// Handle convo.start success - show UI
if (command === 'convo.start') {
// Use SDK's display function to show the UI panel
window.pria.display(true);
}
else if (command === 'assistants.list' && content) {
// Handle assistants list response
console.log("Assistants loaded:", content);
}
else if (command === 'conversations.list' && content) {
// Handle conversations list response
console.log("Conversations loaded:", content);
}
}
else if (data.type === 'pria-error') {
const errorContent = data?.response?.content;
if (errorContent && errorContent.indexOf("not connected") > -1) {
// Retry after delay if not connected
setTimeout(() => startConversation(), 2000);
} else {
console.error("Pria error:", errorContent);
}
}
}
/**
* Wait for Pria to be fully loaded and ready
*/
const waitForPria = () => {
// Use isReady to check if Pria is fully initialized
if (!window?.pria?.isReady()) {
console.log("Waiting for Pria to load...");
return;
}
console.log('Pria loaded and ready');
clearInterval(waitForPriaTimer);
// Subscribe to Pria responses
window.pria.subscribe(handleResponse);
// Start conversation after a brief delay
setTimeout(() => startConversation(), 2000);
// Clean up on page unload
window.addEventListener('beforeunload', () => {
window.pria.unsubscribe(handleResponse);
window.pria.destroy(); // Clean up Pria resources
});
}
let waitForPriaTimer = setInterval(waitForPria, 1000);
```
Use `window.pria.isReady()` to check if Pria is fully initialized before sending commands.
## Integration Class Sample
This example is provided AS IS to demonstrate how you can cleanly integrate a Digital Twin in your Web Application. It is extracted from the playground example code.
```javascript theme={null}
/**
* Javascript Class integration example
* Demonstrates modern patterns for Pria SDK integration
*/
class PriaTestHarness {
constructor() {
this.pria = null;
this.waitForPriaTimer = null;
this.isConnected = false;
this.conversationMode = 'existing'; // 'existing' or 'new'
this.assistantsCache = []; // Cache assistants for lookup
// Configuration
this.config = {
displayOptions: {
buttonPositionRight: 'calc(50% - 40px)',
buttonPositionBottom: '80px'
},
instanceConfig: {
publicId: 'f831501f-b645-481a-9cbb-331509aaf8c1',
pictureUrl: 'https://cdn.domain.com/pics/dt_1.png'
},
userConfig: {
email: 'john@doe.com',
profilename: 'John Doe',
usertype: 1,
userid: 110,
roleid: 123,
rolename: "Course ABC",
partnerid: 1,
partnername: "ABC Global Inc."
},
localhost: true
};
this.init();
}
/**
* Initialize the application
*/
async init() {
try {
await this.loadPriaSDK();
}
catch (error) {
console.error('Failed to initialize application:', error);
}
}
/**
* Load the Pria SDK
*/
loadPriaSDK() {
return new Promise((resolve, reject) => {
const script = document.createElement('script');
script.src = 'pria-sdk-web.js';
script.async = true;
script.onload = () => {
console.log('Web SDK Script loaded');
const url = 'https://pria.praxislxp.com';
PriaIntegration.loadSdk(
url,
this.config.displayOptions,
this.config.instanceConfig,
this.config.userConfig
);
this.waitForPriaTimer = setInterval(() => this.waitForPria(), 1000);
resolve();
};
script.onerror = (error) => {
console.error('Failed to load Web SDK:', error);
reject(new Error('Web SDK loading failed'));
};
document.body.appendChild(script);
});
}
/**
* Wait for Pria to be available and set up subscriptions
*/
waitForPria() {
// Use isReady() to check if Pria is fully initialized
if (!window.pria?.isReady()) {
console.log("Waiting for Pria to load...");
return;
}
clearInterval(this.waitForPriaTimer);
this.pria = window.pria;
this.isConnected = true;
// Subscribe to Pria responses
this.pria.subscribe(this.handlePriaResponse.bind(this));
// Load assistants and conversations on connection
this.loadAssistants();
this.loadConversations();
// Clean up on page unload
window.addEventListener('beforeunload', () => {
this.pria.unsubscribe(this.handlePriaResponse);
this.pria.destroy(); // Clean up Pria resources
});
}
/**
* Handle responses from Pria
*/
handlePriaResponse(response) {
const command = response?.response?.command;
const content = response?.response?.content;
if (response.type === 'pria-response') {
console.log("Processing command:", command);
// Handle convo.start success - show UI
if (command === 'convo.start') {
this.showPria();
}
else if (command === 'assistants.list' && content) {
this.assistantsCache = content;
console.log("Assistants loaded:", content.length);
}
else if (command === 'conversations.list' && content) {
console.log("Conversations loaded:", content.length);
}
}
else if (response.type === 'pria-error') {
console.error("Pria error:", content);
}
}
/**
* Start a conversation
*/
startConversation(assistantId, conversationId, conversationName) {
if (!this.isConnected) return;
let request = { command: 'convo.start' };
if (assistantId) {
request.assistantId = assistantId;
}
if (conversationId && conversationName) {
request.selectedCourse = {
course_id: conversationId,
course_name: conversationName
};
}
this.pria.send(request);
}
/**
* Load assistants list
*/
loadAssistants() {
if (!this.isConnected) return;
this.pria.send({ command: 'assistants.list' });
}
/**
* Load conversations list
*/
loadConversations() {
if (!this.isConnected) return;
this.pria.send({ command: 'conversations.list' });
}
/**
* Toggle Pria visibility (show/hide entirely)
*/
togglePriaVisibility(visible) {
if (!this.isConnected) return;
this.pria.setVisible(visible);
}
/**
* Toggle Pria panel display (expand/collapse)
*/
togglePriaDisplay() {
if (!this.isConnected) return;
// Use SDK's isDisplayed() to check current state
const isCurrentlyDisplayed = this.pria.isDisplayed();
this.pria.display(!isCurrentlyDisplayed);
}
/**
* Show Pria interface
*/
showPria() {
if (!this.pria) return;
// Check if UI is already shown using SDK's isDisplayed()
if (!this.pria.isDisplayed()) {
this.pria.display(true);
}
}
}
// Initialize the application when DOM is loaded
document.addEventListener('DOMContentLoaded', () => {
new PriaTestHarness();
});
```
### Key SDK Methods Used
| Method | Description |
| ---------------------------- | ---------------------------------------------------------------- |
| `pria.isReady()` | Check if Pria is fully initialized and ready to receive commands |
| `pria.subscribe(callback)` | Listen for responses from Pria |
| `pria.unsubscribe(callback)` | Remove a response listener |
| `pria.send(request)` | Send a command to Pria |
| `pria.setVisible(visible)` | Show or hide Pria entirely (removes from DOM view) |
| `pria.isVisible()` | Check if Pria is currently visible |
| `pria.display(show)` | Expand or collapse the Pria UI panel |
| `pria.isDisplayed()` | Check if the UI panel is currently expanded |
| `pria.destroy()` | Clean up and remove Pria from the page |
### Checking Ready State
Always verify Pria is ready before sending commands:
```javascript theme={null}
/**
* Check if Pria SDK is ready to receive messages
* @returns {boolean} True if SDK is fully connected and ready
*/
function isPriaReady() {
return window.pria &&
typeof window.pria.isReady === 'function' &&
window.pria.isReady();
}
// Usage in your application
if (isPriaReady()) {
window.pria.send({ command: 'convo.start' });
}
```
The `isReady()` method returns `true` only when the SDK is fully connected to the middleware and ready to send/receive messages.
### Cleanup and Reload
When you need to remove Pria or reload it with new configuration:
```javascript theme={null}
// Destroy SDK completely (removes all UI, event listeners, and references)
PriaIntegration.destroySdk();
// Reload with new or existing configuration
PriaIntegration.reloadSdk(
'https://pria.praxislxp.com',
displayOptions,
instanceConfig,
userConfig
);
```
After calling `destroy()` or `destroySdk()`, all existing references to `pria` become invalid. The SDK must be fully reloaded before use.
## SDK Playground Example
See a live demo: at [SDK Playground Example](https://pria.praxislxp.com/pria-sdk-web-sample.html).
```
https://pria.praxislxp.com/pria-sdk-web-sample.html
```
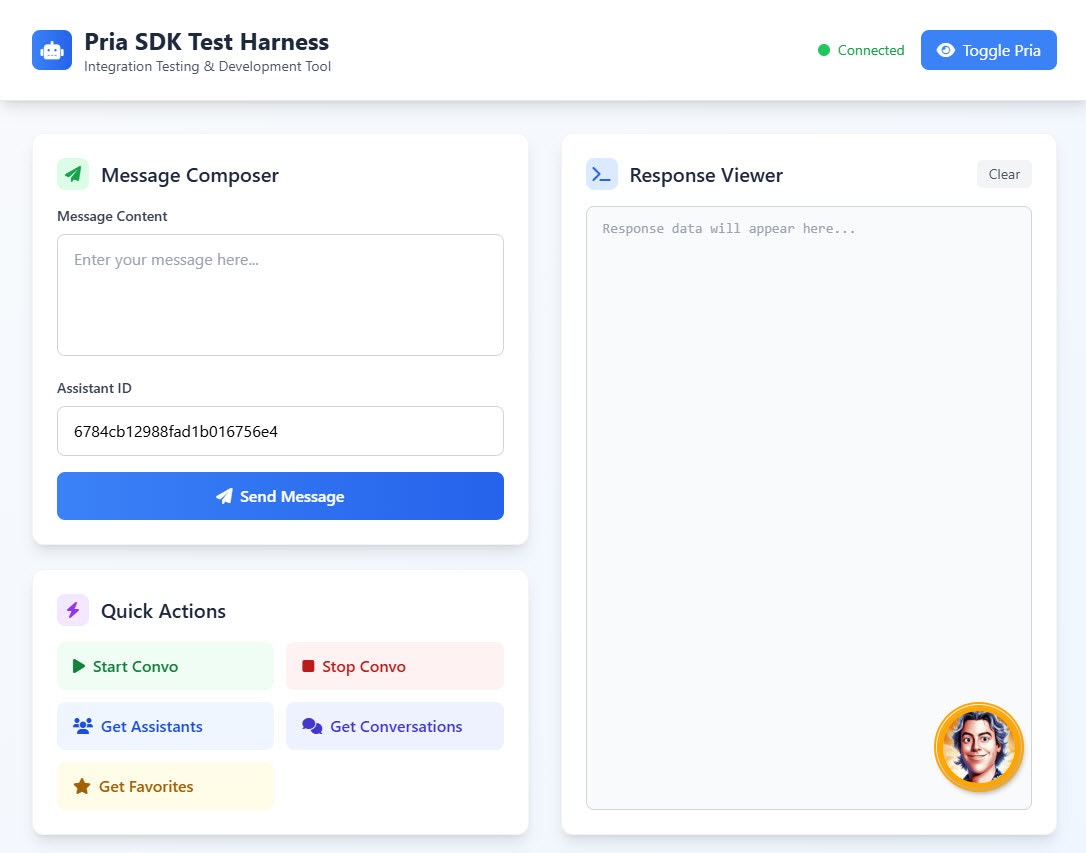 This demo covers integration, connection detection, command execution, and more.
## Automation
Refer to the [Javascript APIs](/mdx/sdk/javascript) for interacting with your Digital Twin programmatically using Javascript
This demo covers integration, connection detection, command execution, and more.
## Automation
Refer to the [Javascript APIs](/mdx/sdk/javascript) for interacting with your Digital Twin programmatically using Javascript