

Audio Notes is a personal-vault feature. Recordings always land in your Audio Notes collection inside your Personal IP Vault — never in a Digital Twin’s or an account’s vault.
When to use Audio Notes
Audio Notes turn a thirty-second voice memo into searchable, citation-ready knowledge in your IP Vault. Use it when:- You’re walking, driving, or away from a keyboard and want to capture a thought your digital twin can later reference.
- You’re debriefing after a meeting and want the takeaways in your vault without typing them up.
- You’re training your twin on tacit knowledge that’s faster to say than to write — process tips, customer anecdotes, decision rationales.
Recording a note
Audio Notes lives in the [+] action menu on the chat input bar, under Audio → New Audio Note. It’s enabled by default for personal accounts and for Digital Twins, but several conditions can hide it:- Your browser doesn’t expose a usable microphone, or you’re somewhere recording isn’t available (a kiosk, an automated browser, or a page not served over HTTPS).
- You’re using the twin in Guest UI mode.
- The Digital Twin’s administrator has turned on Disable File Upload for Users (audio notes are file uploads, so the same gate applies).
- The Digital Twin’s administrator has switched Disable Audio Notes for Users on. (When this feature launched, it started switched off for every existing Digital Twin — so if you want it, ask your administrator to turn it on.)
- Open the [+] menu and choose Audio → New Audio Note to open the recorder.
![The [+] action menu expanded with the Audio option selected.](https://mintcdn.com/praxisai/ibcwyLwL5tldF2mQ/images/user-guide/files-documents/audio-menu-option.webp?fit=max&auto=format&n=ibcwyLwL5tldF2mQ&q=85&s=7a73a201c194ee70631e5f40ab63ad02)
Open the [+] action menu and select Audio.
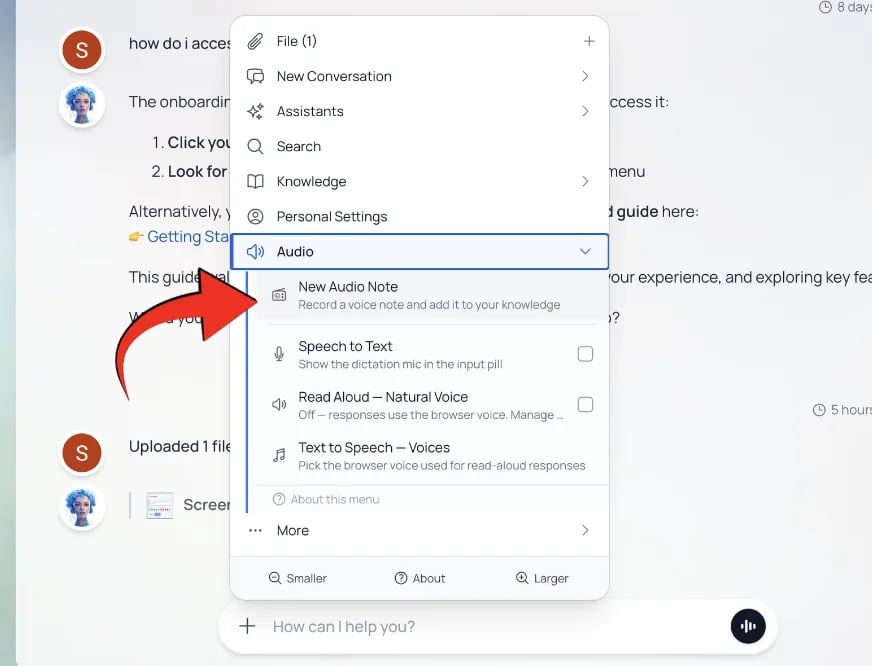
Click New Audio Note to open the recorder.
- Tap the round mic button to start recording. A live level meter shows that audio is being picked up — bars shift from gray to red as your voice gets louder.
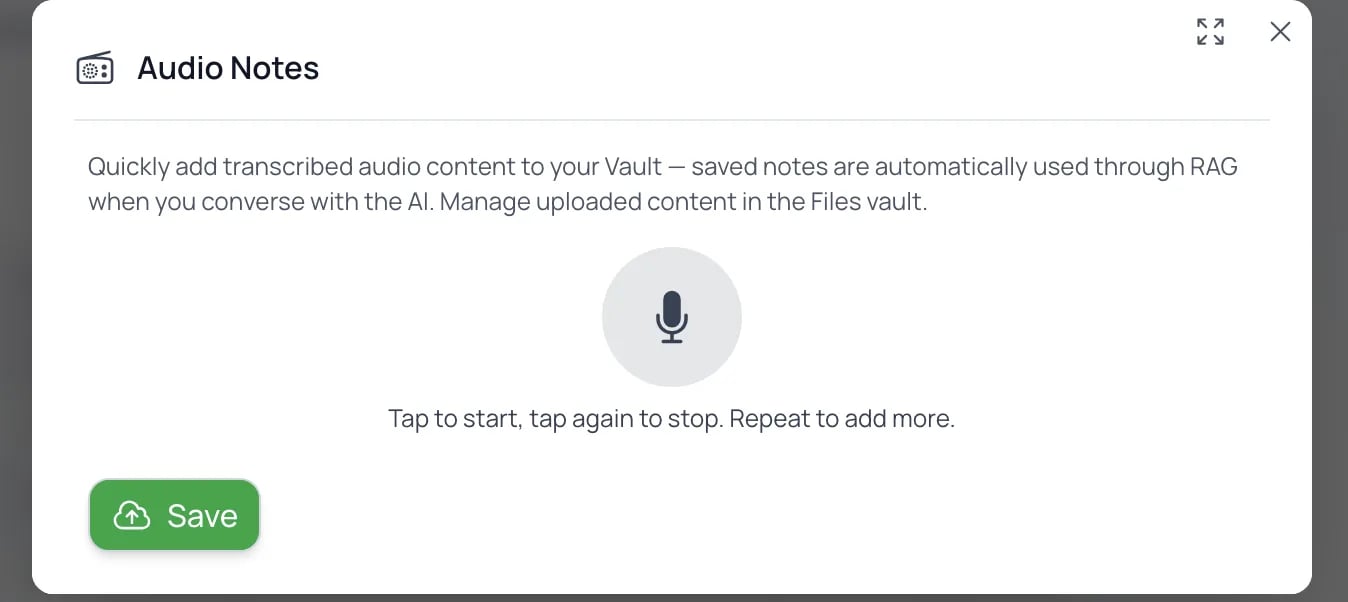
Click the microphone to start recording; click again to stop.
- Tap again to stop. The segment appears in a list with an inline player. Repeat to add more segments to the same note.
- Each segment can be played back, renamed, reordered (↑/↓), or deleted before saving.
- Combine audio into a single note is on by default — when checked, all your clips are joined into a single recording — with no loss of quality — before it is written up. Uncheck to file each segment as its own note.
- Hit Save. A green confirmation appears: “Audio note sent for processing.” Your recording is queued; the modal closes when you tap Close.
The mobile experience uses the same click-to-toggle interaction as desktop. There’s no press-and-hold so recordings of any length work the same on a phone as on a laptop.
What happens after Save
Saving returns immediately and the rest happens in the background:- Transcription runs through the speech-to-text model configured for your account (the same engine used for any audio you’d upload).
- Title generation — once the transcript exists, a short, descriptive title is produced (e.g. “Quarterly planning notes”). The note’s filename is replaced with this title automatically.
- Embedding & indexing — the transcript is chunked, sanitized, embedded, and stored alongside your other vault content. From here on, RAG retrieval works exactly as it would for any uploaded file.
- History entry — the upload is linked to a conversation history row tagged with the active assistant and selected course (if any), so token usage and credits are accounted against your normal balance.
Combining vs. separate notes
Combine works only when every segment shares the same audio format. If the modal detects a mismatch (rare — only happens across sessions/devices), the checkbox is automatically disabled and the segments are saved separately with a small notice.
File limits
There is no fixed duration cap — the 50 MB per-segment limit is the effective bound, and compressed voice audio only takes a few MB per 10 minutes of speech, so even long recordings fit comfortably.
Managing audio notes
Audio notes appear in the Audio Notes collection of your personal vault and behave like any other file:- Rename — change the title; the original transcript-derived name is kept as a hint.
- Delete — moves the note to the Trash, where it stays restorable for 30 days before being permanently deleted.
- Include in AI Search / Exclude from AI Search — whether your twin uses this note as a knowledge source.
- Keep if unused — like other personal files, a note that goes unused for your file longevity period (90 days by default) moves to the Trash. See How long files are kept.
- Move to another collection — drag it out of Audio Notes if you want it filed elsewhere.
.webm (or .mp4 on iOS Safari) audio is preserved alongside the transcript, so you can replay any note from its file detail view.
Privacy
- Recordings are uploaded over HTTPS.
- Browser-side audio is held in memory only until you tap Save — closing the modal or browser before saving discards everything; nothing leaves your device until the upload is queued.
- Personal-vault content is private to your account — audio notes always land in your Personal IP Vault, which other users can’t browse.
- Your recording is written up by whichever AI service your organisation has set up. The same data-handling and retention policies apply as for any audio you’d upload manually via the file picker.