

Getting Started
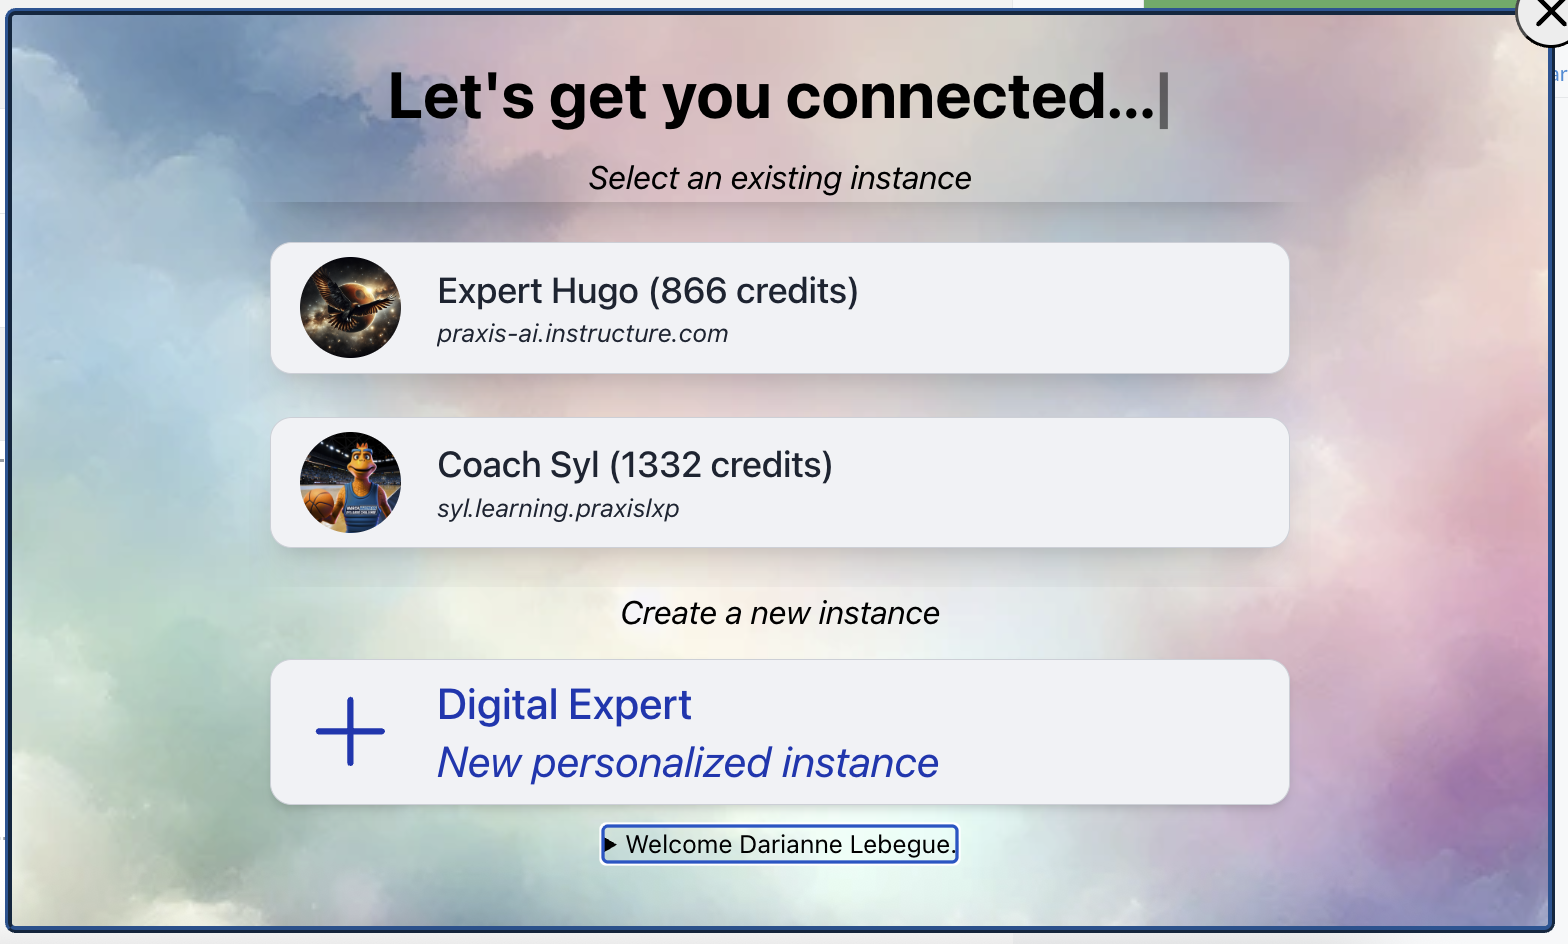
When your Canvas administrator places a generic digital twin in your course, the first launch shows a “Let’s get you connected” screen with two paths:- Select an existing instance — reuse a Digital Twin already associated with your account. Each one appears as a clickable card showing its name and remaining credits.
- Or create a new instance — start fresh with a course-specific Digital Twin.
Creating a Digital Twin
Initial Setup Process
When you first access your digital twin through your LMS, you’ll be welcomed by the Digital Twin wizard that guides you through the creation process.1
Access the Digital Twin
Navigate to your course in your Learning Management System (LMS) and click on the digital twin icon, typically located in the bottom-right corner of your course page.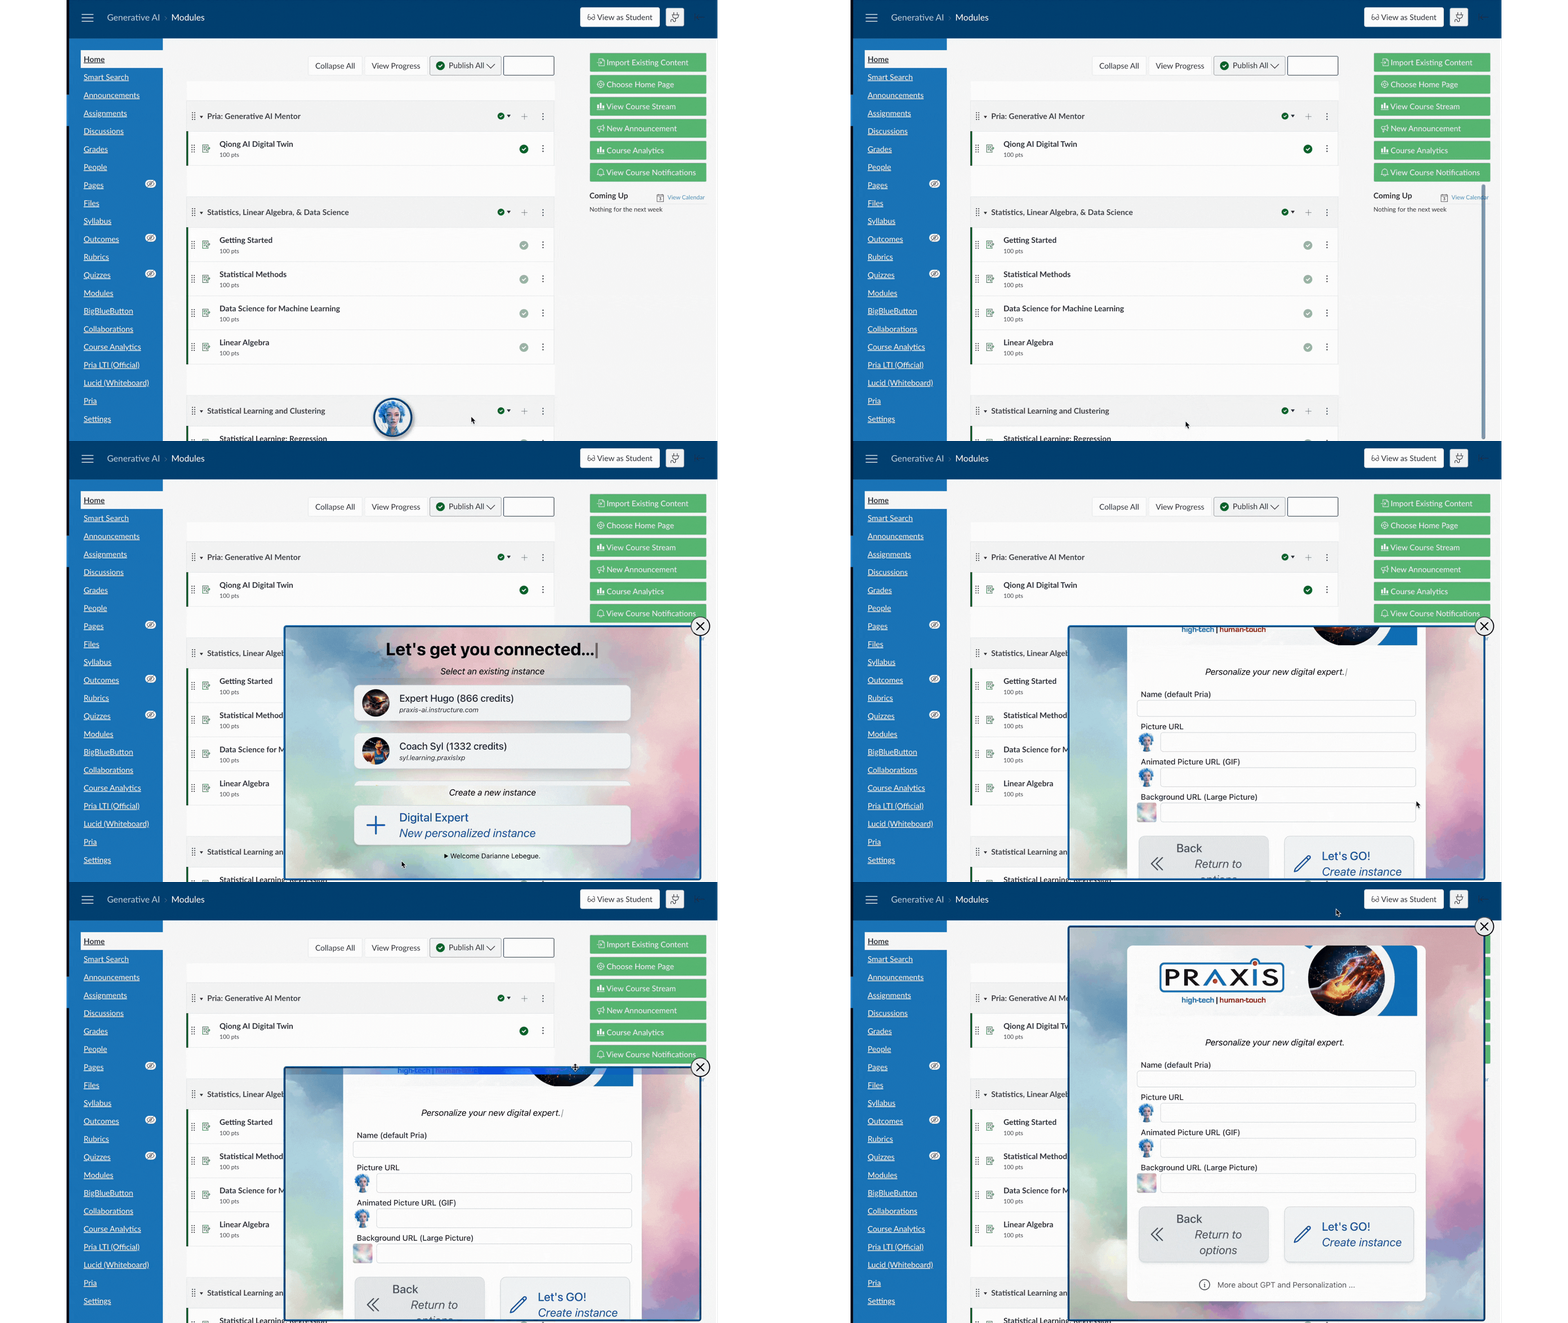
2
Start the Creation Wizard
Click the Digital Twin button (a tile labelled “New personalized instance”) to create a personalized instance of your AI assistant.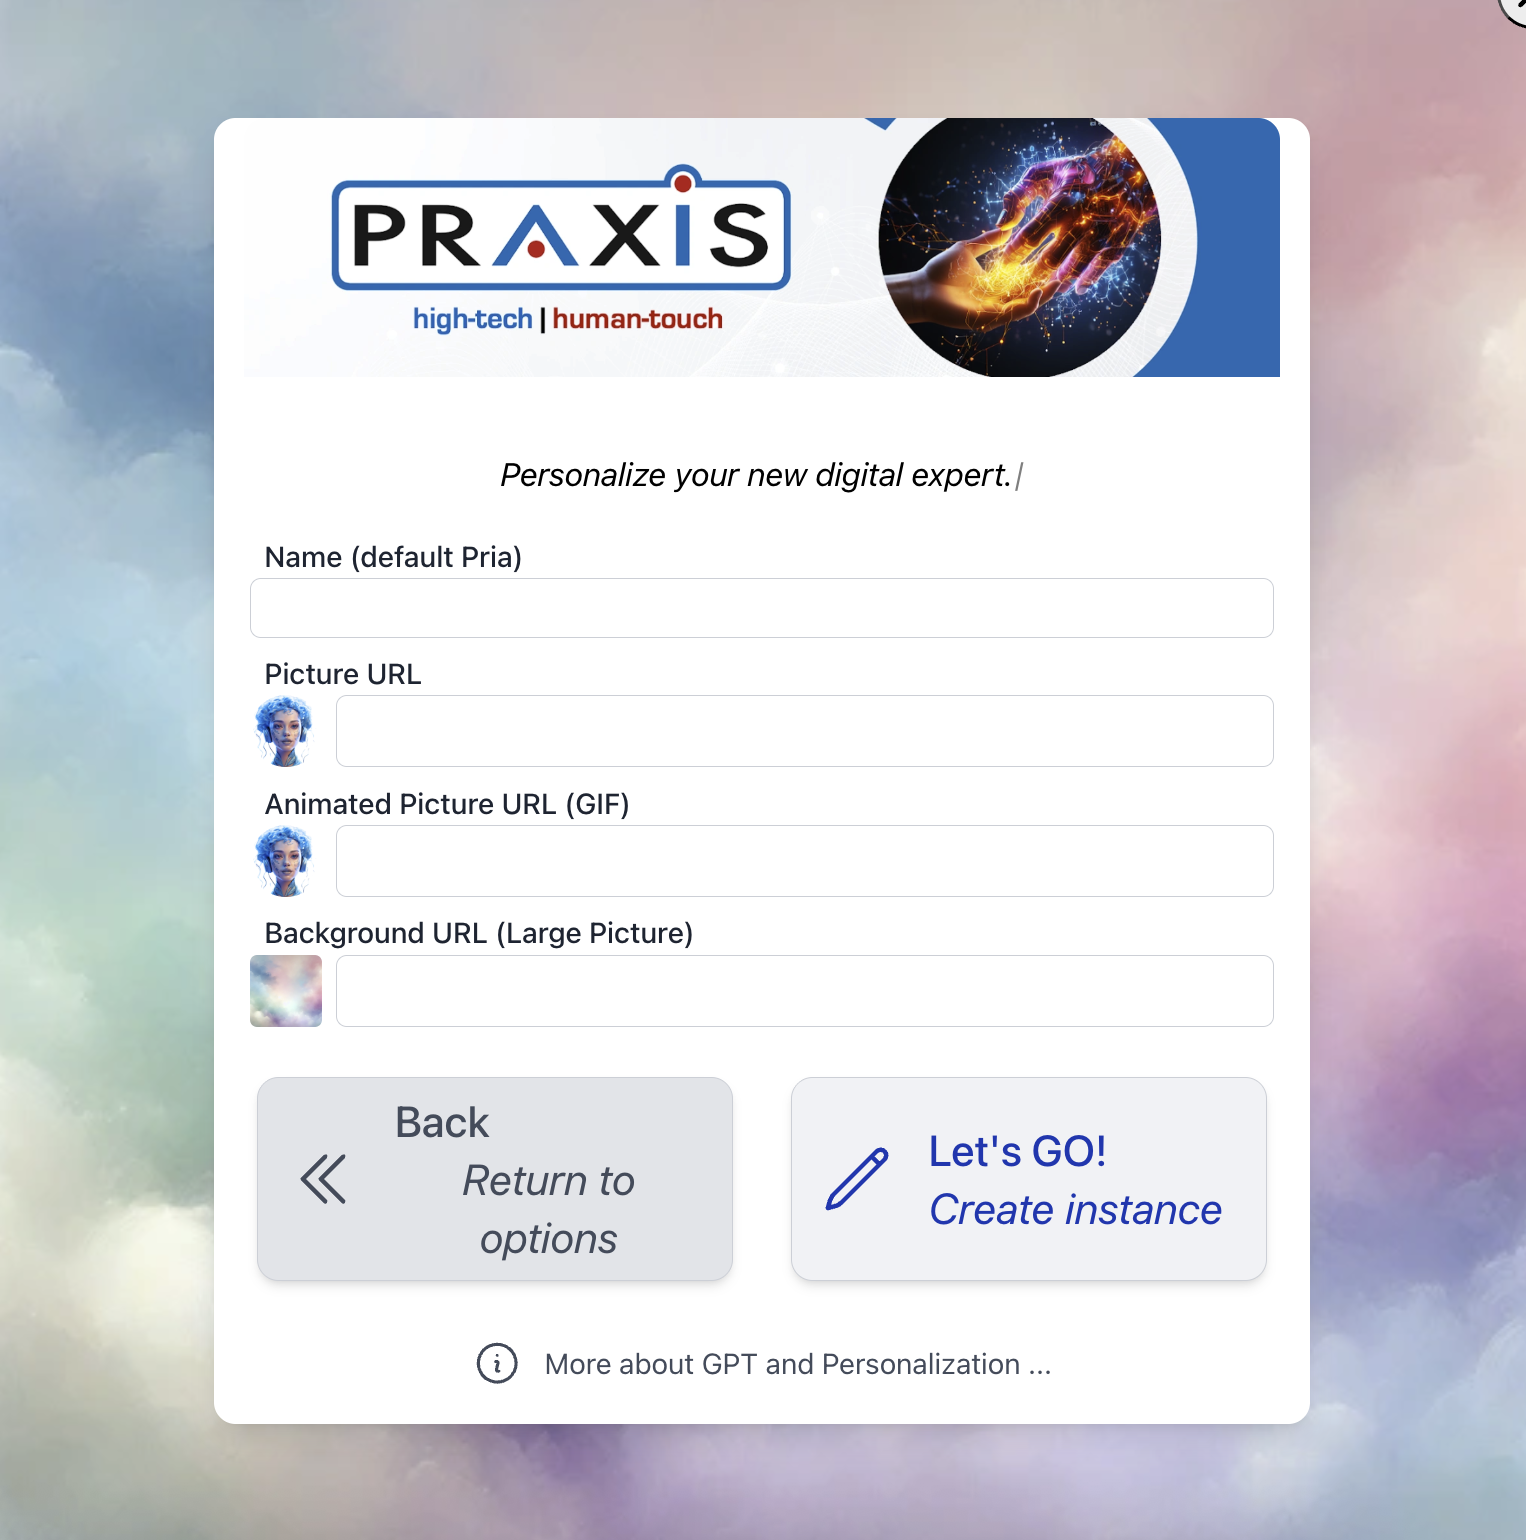
Digital Experts and Digital Twins use identical creation workflows but fulfill distinct roles. Digital Twins are personalized AI assistants that mirror your individual expertise, knowledge base, and teaching methodology, while Digital Experts offer specialized domain knowledge without personal customization. The key differentiator is the personalization prompt you provide during setup—this determines whether the AI reflects your unique perspective or maintains a more generalized expert persona.
3
Configure Your Digital Twin
In the New Digital Twin dialog, enter:
- Name: Choose a name for your twin (defaults to “Pria” if left blank — e.g. “Professor Smith’s Assistant”)
- Picture URL: Provide a publicly accessible image URL (no CORS restrictions). A live preview appears as you type.
4
Complete Setup
Click Let’s GO! to finish creating your new digital twin instance.
For a complete step-by-step creation guide with tips on naming, images, and personalization, see Create Your Digital Twin. For advanced configuration, refer to the Personalization Guide.
Unlinking a Digital Twin
When to Unlink
You may need to unlink your digital twin from a course if you want to:- Associate a different digital twin instance with the course
- Create a completely new digital twin for that course
- Remove the digital twin entirely
Unlinking Process
1
Access Your Profile
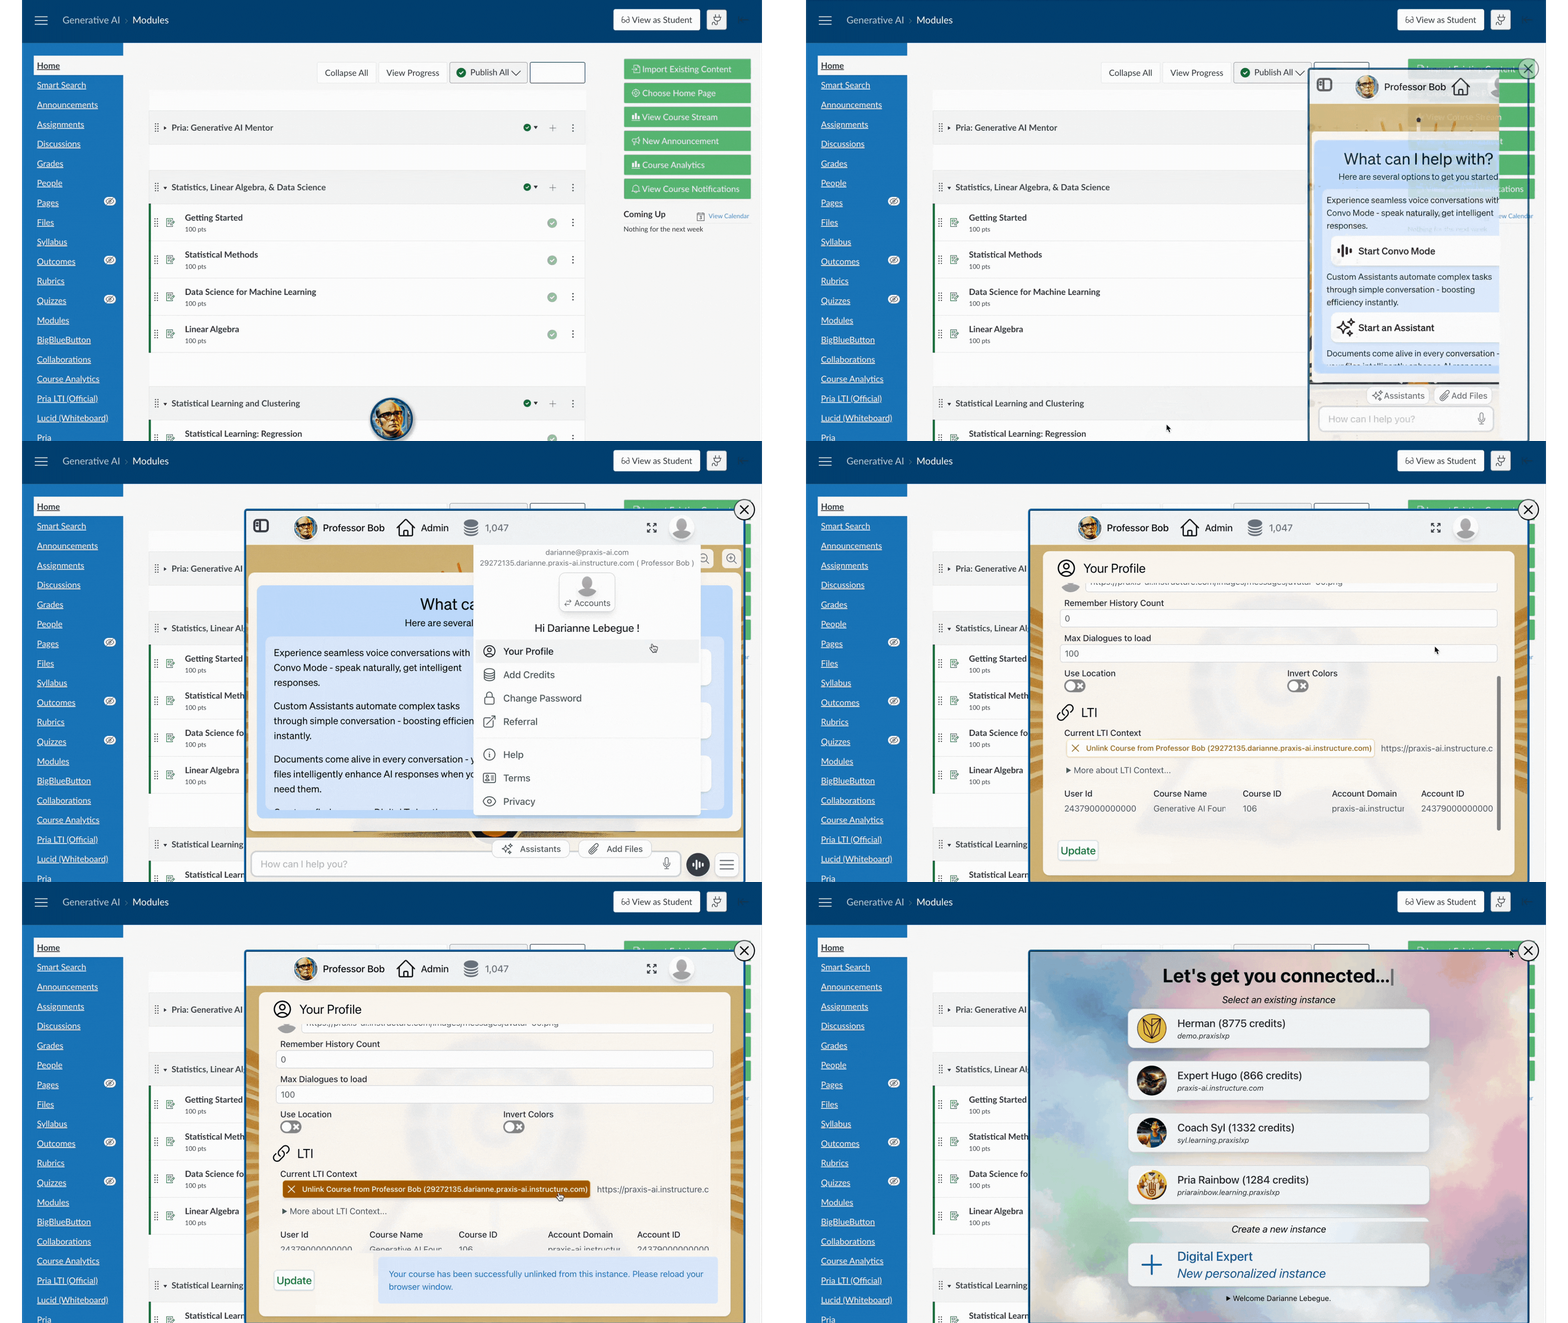
Navigate to your digital twin interface and go to your Profile page.
2
Locate the Canvas / LTI tab
Open the Canvas / LTI tab and find the LTI Integration section, which shows the Course Connection linking this twin to your current course.
3
Unlink Course
Click the red Unlink Course button to disconnect the digital twin from the current course. This takes effect immediately — there’s no separate confirmation prompt.
4
Reload
Pria confirms the course has been unlinked and asks you to reload your browser window to finish.
After unlinking, you’ll need to go through the setup process again the next time you access the digital twin in that course.
Uploading Course Materials
It’s a good idea to supplement your digital twin’s knowledge by uploading course materials. That way, if Canvas ever fails to connect, your students will always have access to pertinent information. Useful course files to upload include the syllabus, policies, and assignments.Method 1: Direct Upload to IP Vault
1
Open the IP Vault
From the [+] action menu, choose Add Photos & Files.
2
Select files
Drag and drop, paste, or browse to pick the documents to upload.
3
Upload
Confirm the upload — each file is processed and indexed automatically.
4
Organize
Use Collections and clear file names to keep materials easy to find.
Method 2: LMS Integration
With LMS integration configured, your twin can reach course content directly:
- Course syllabi
- Assignment descriptions
- Discussion forums
- Gradebook information
- Course announcements
Contact your IT administrator to configure LMS integration for automatic course content access.
Supported File Types
Your digital twin can work with various types of course materials:- Documents: PDF, Word documents, text files
- Presentations: PowerPoint (
.pptx), Google Slides - Spreadsheets: Excel, Google Sheets, CSV files
- Images: JPEG, PNG, GIF files
- Audio/Video: MP3, MP4, and other multimedia formats
Best Practices for Course Materials
Organize by Topic
Group related materials together and use clear, descriptive file names.
Include Context
Add descriptions explaining how each material fits into your course structure.
Update Regularly
Keep materials current by uploading new content and removing outdated files.
Quality Content
Ensure uploaded materials are clear, well-formatted, and relevant to student needs.
Specialized Assistants
Your digital twin platform includes access to various specialized AI assistants designed for specific educational tasks.1
Open Assistant Menu
Click the Assistant button located at the bottom-right of your screen.
2
Browse Available Options
Review the list of specialized assistants available for your institution.
3
Select Assistant
Click on the assistant that best matches your current educational need.
4
Begin Interaction
Follow the assistant’s prompts to start your specialized educational task.
You can even create your own custom assistants!
Integration with Course Materials
Specialized assistants can access and utilize your uploaded course materials to provide:- Contextual responses based on your specific curriculum
- Personalized feedback aligned with your teaching objectives
- Course-specific examples drawn from your materials
- Consistent messaging that matches your pedagogical approach
Using Praxis AI Custom Tools
Praxis AI Custom Tools enhance your Canvas courses with AI-powered assistance through two main features: creating custom AI assistant buttons and enabling contextual AI responses through content highlighting.
Assistant Button Creator
Creating AI Assistant Buttons
1
Access Page Editor
Navigate to any Canvas page and click Edit to enter the page editor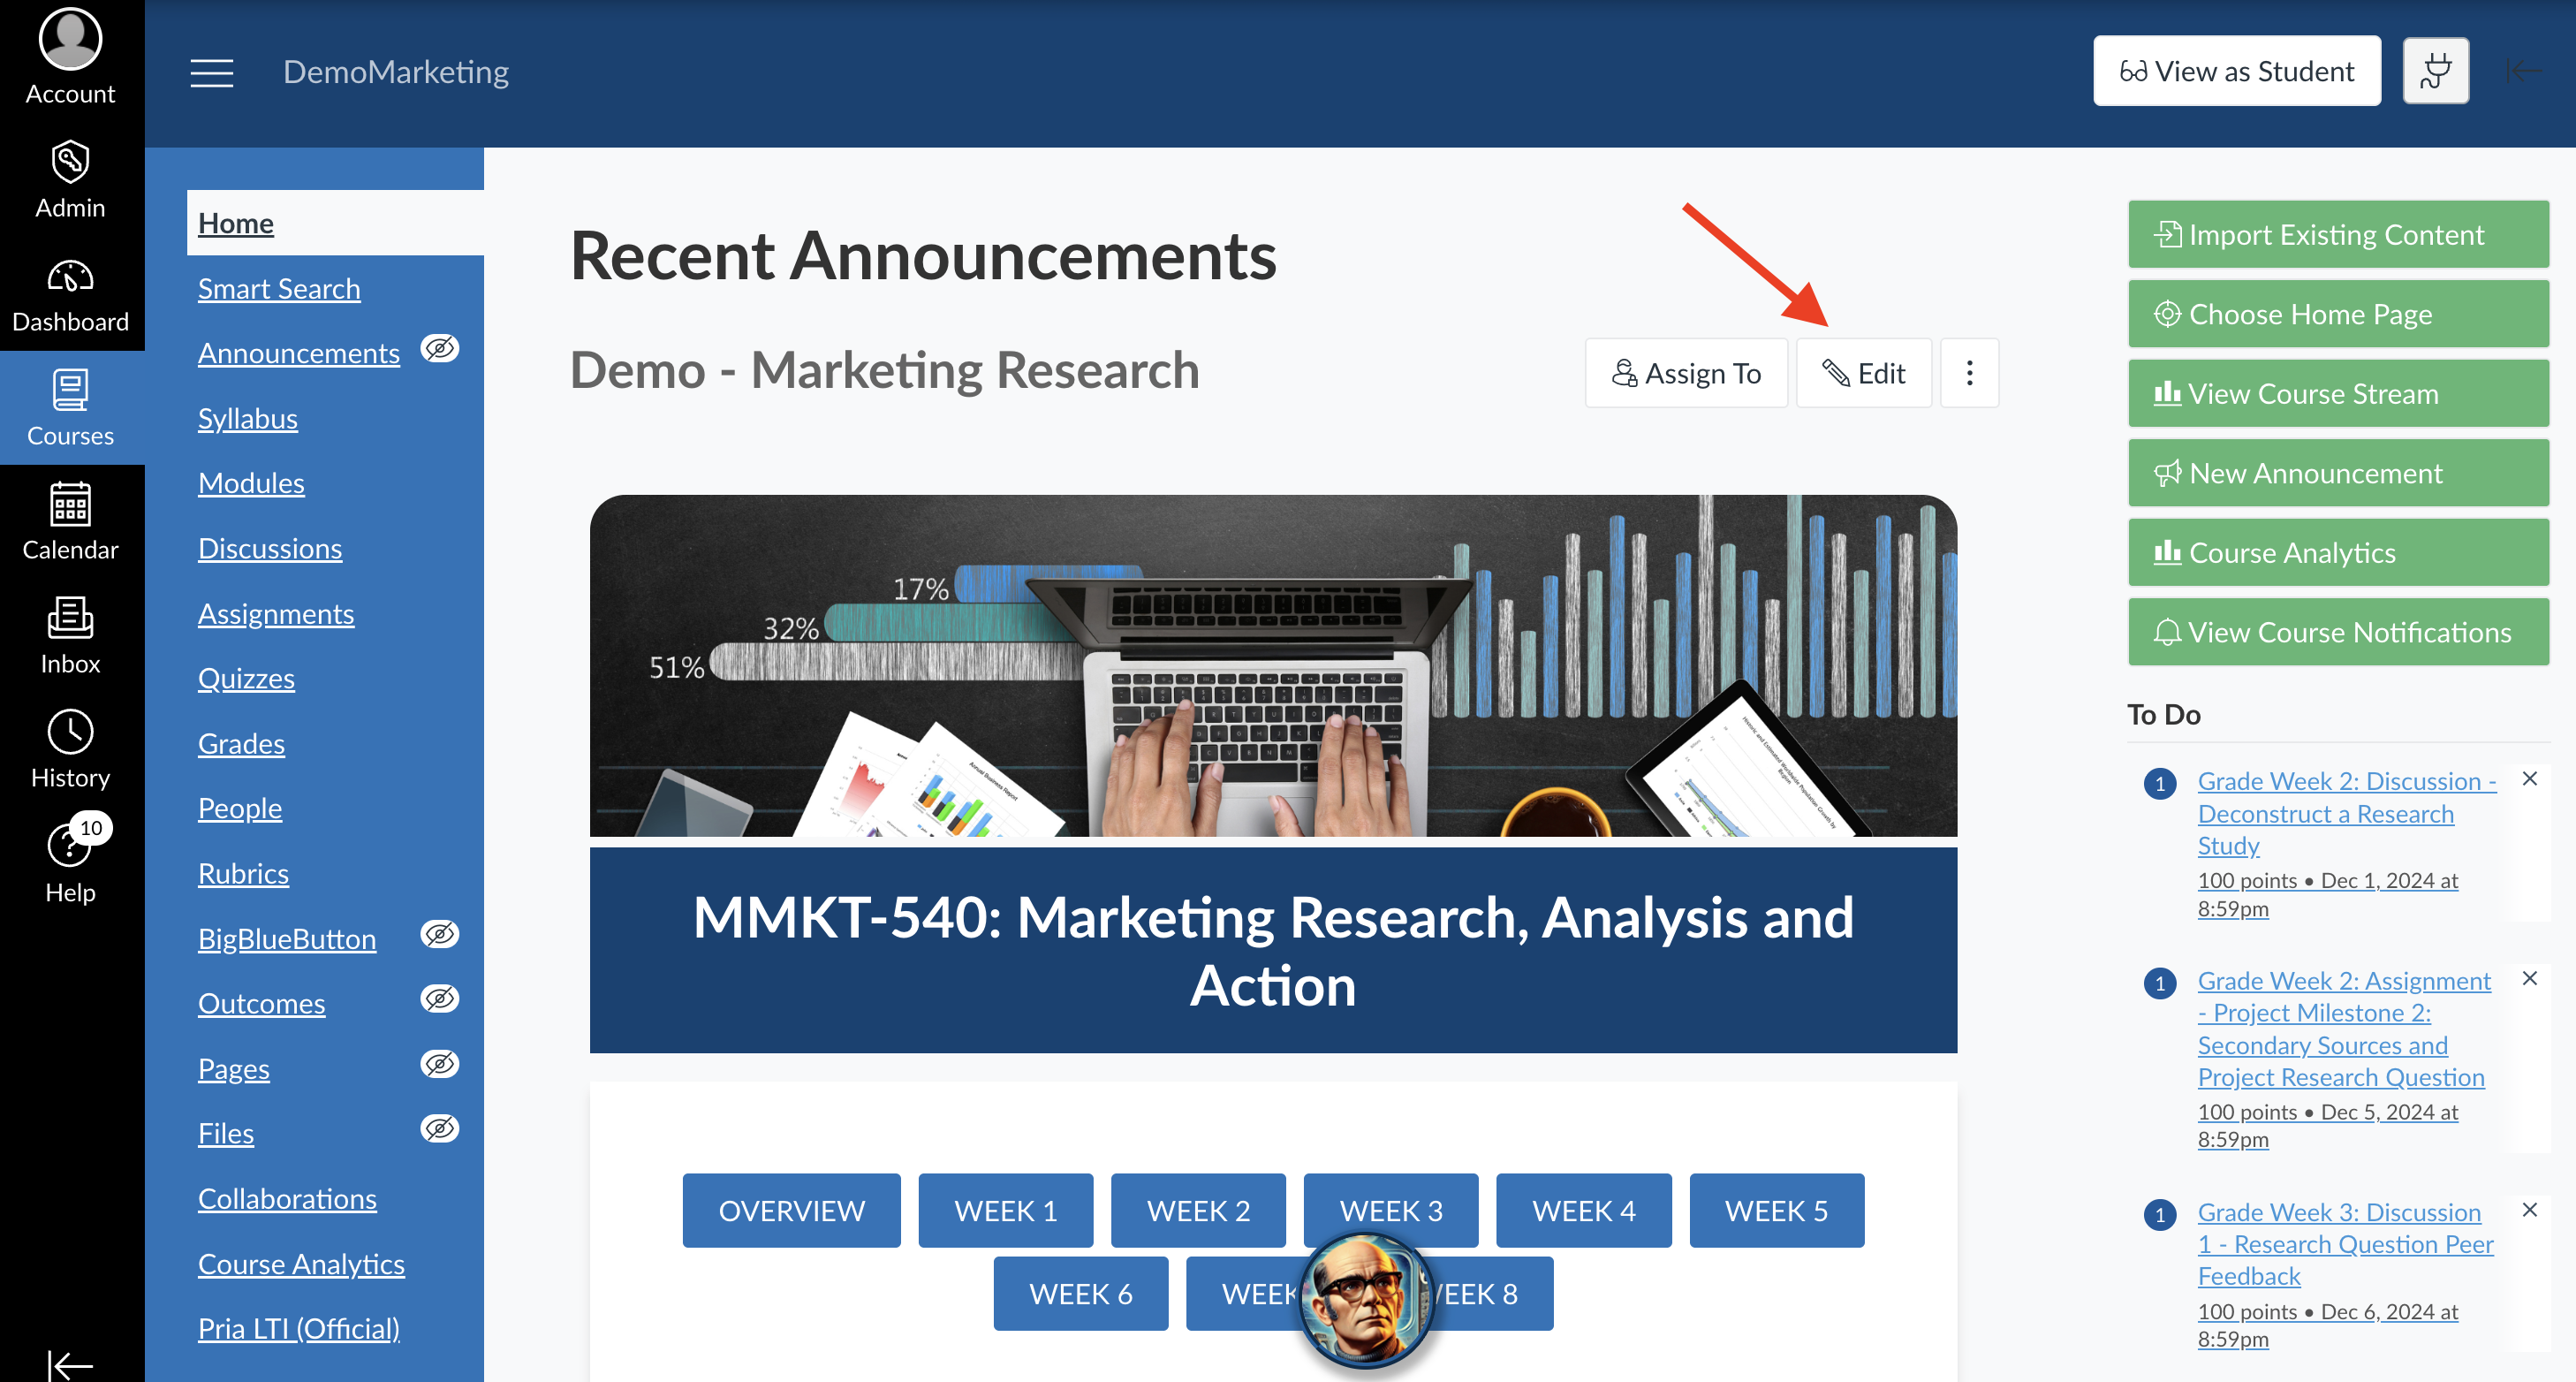
2
Locate Button Tool
Find the Praxis AI Button Creator in your editor toolbar (appears after tools installation). It will appear as a magic wand 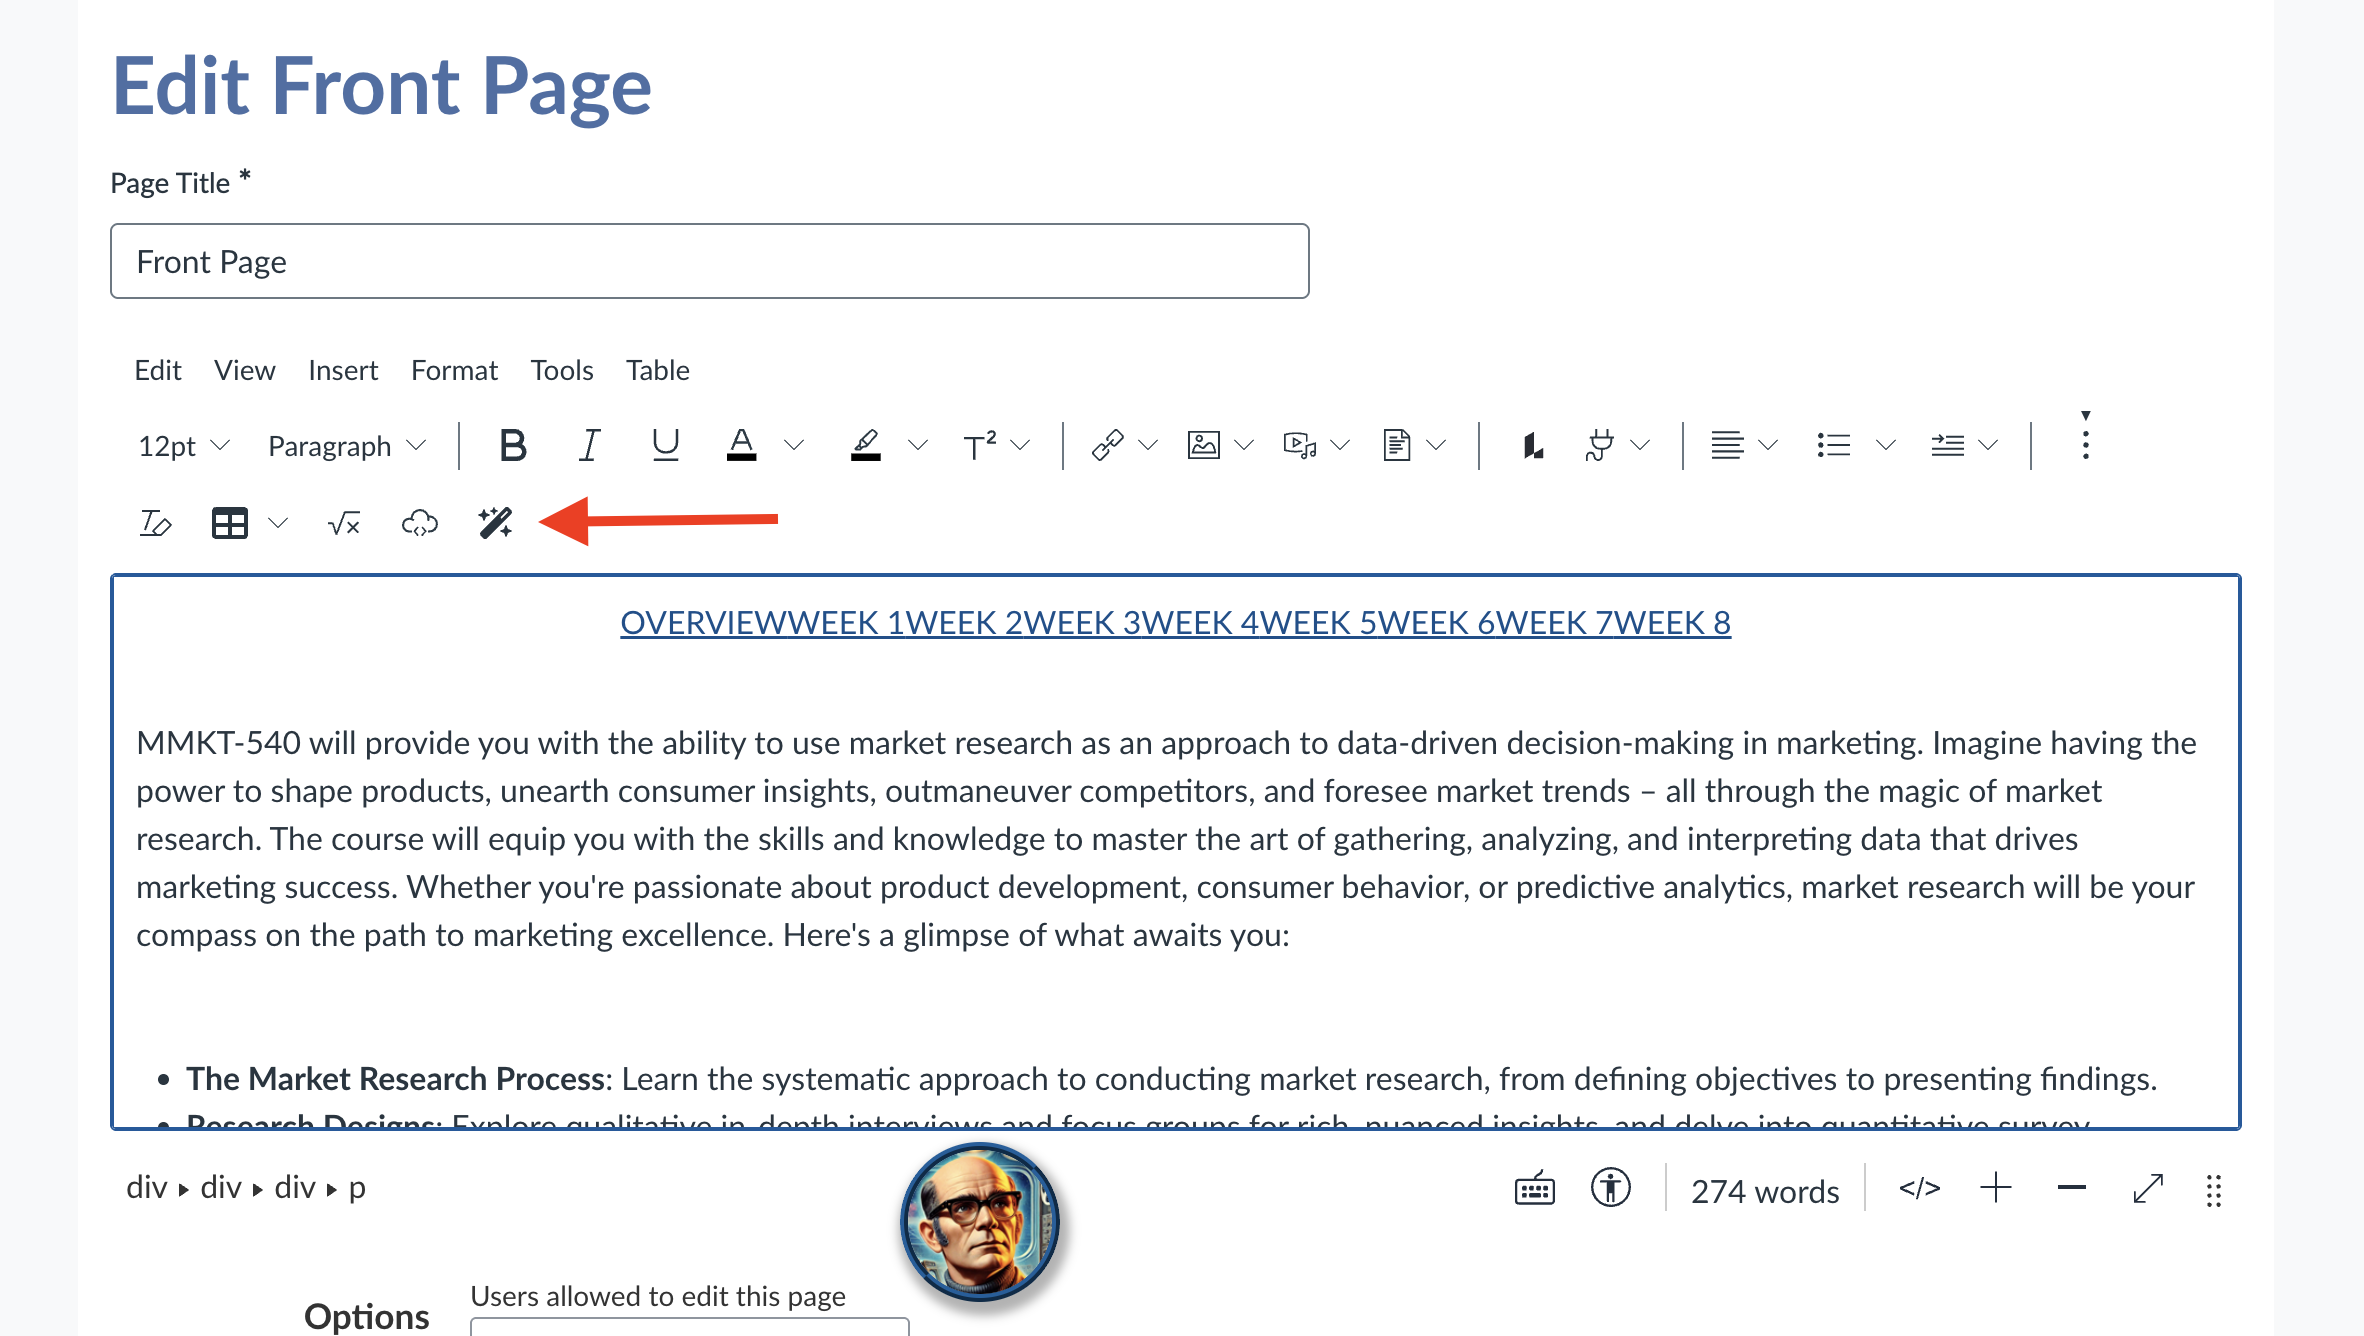
3
Configure Your Button
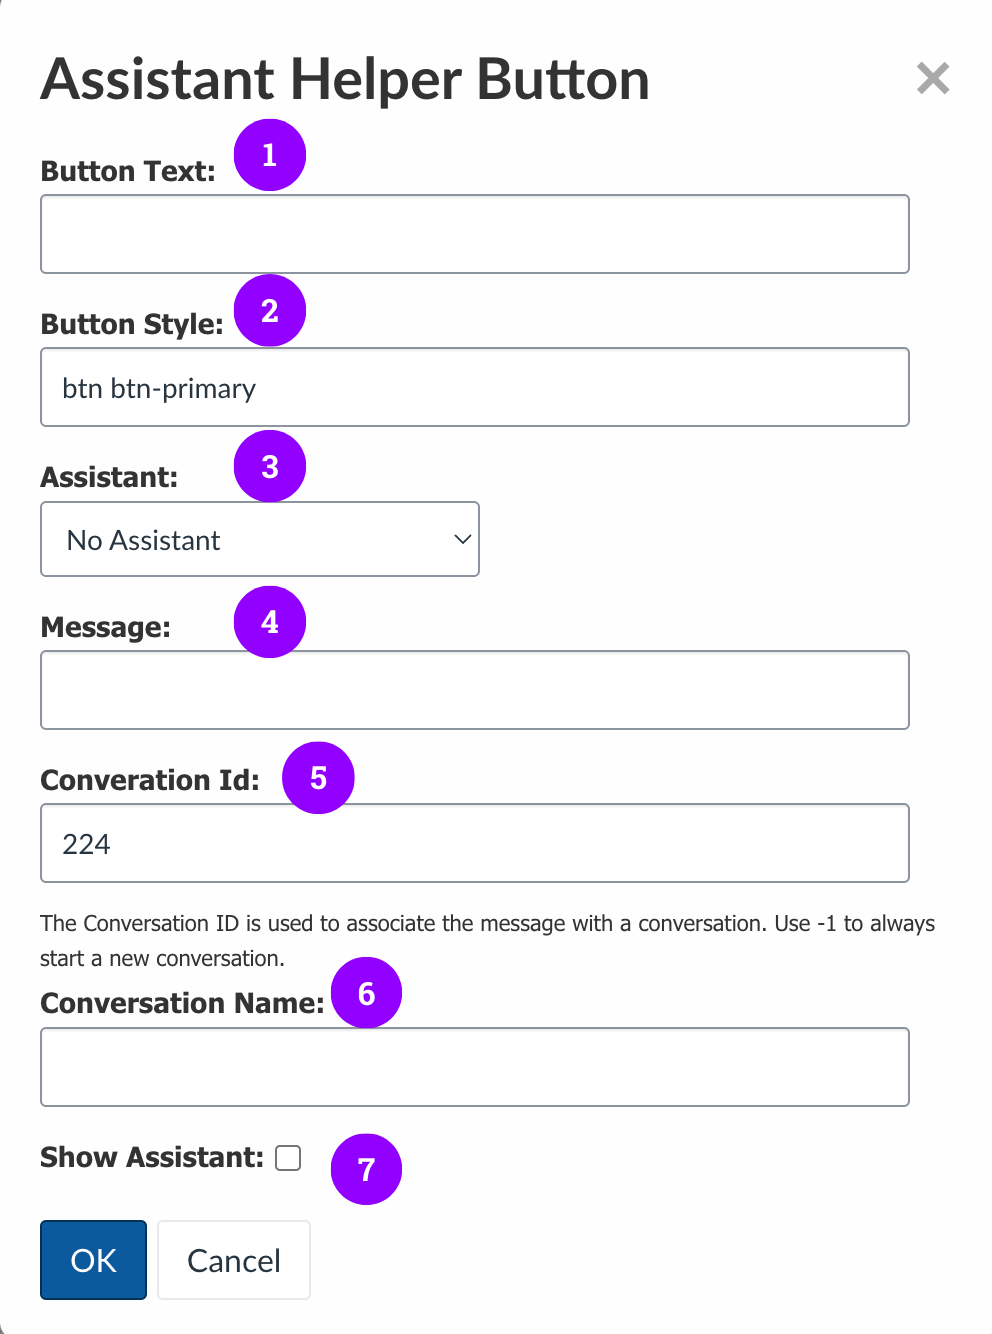
AI Assistant Selection
AI Assistant Selection
Choose which specific AI assistant will be activated when users click the button. Ensure the selected assistant aligns with the button’s intended purpose and course content.
Launch Message
Launch Message
Compose a brief welcome message that the AI will display when the button is pressed. This message should:
- Greet the user appropriately
- Set expectations for the interaction
- Provide context for the assistance available
Conversation Threading
Conversation Threading
Conversation ID:
- Use your course code to launch conversations within the existing course thread
- Set to -1 to create a new, separate conversation thread for each button press
Launch Behavior
Launch Behavior
Visible Launch: Enable this option to show the assistant interface when activatedSilent Launch: Disable to have the assistant respond without displaying the full interface
4
Save and Publish
Save your page - the button is now available to students
Best Practices for Assistant Buttons
Strategic Placement
Place buttons where students naturally seek help - near complex concepts, assignments, or problem sets
Clear Labeling
Use descriptive text that indicates the button’s purpose (e.g., “Math Problem Solver” vs. “Click Here”)
- “Ask the Course AI” - General course assistance
- “Assignment Help” - Specific to assignment pages
- “Concept Clarification” - Near complex topics
- “Study Guide Generator” - On review materials
Content Highlight AI Launcher
How It Works
The highlight tool allows both you and your students to get instant AI assistance on any Canvas content.1
Highlight Text
Select any text content on Canvas pages (readings, assignments, discussions)
2
Launch AI
Right-click the highlighted text or use the highlight menu to access AI options
3
Get Contextual Help
AI analyzes the highlighted content and provides relevant explanations or assistance
Faculty Use Cases
Course Development
Course Development
- Highlight complex passages to generate simplified explanations
- Create supplementary content for difficult concepts
- Generate discussion questions from readings
Student Support
Student Support
- Demonstrate how to use the tool during class
- Encourage students to highlight confusing terms or concepts
- Model effective questioning techniques
Implementation Tips
- Test First - Try both tools in a practice course before rolling out
- Train Students - Show students how to use the highlight feature in your first class
- Strategic Placement - Add assistant buttons to high-traffic pages (syllabus, major assignments)
- Place buttons contextually near relevant content
- Use descriptive, action-oriented button text
- Encourage students to highlight unfamiliar terms
- Model appropriate AI interaction during class
- Overload pages with too many buttons
- Use vague button labels like “Help” or “AI”
- Assume students know how to use the tools without instruction
Quick Troubleshooting
Highlight Feature Not Working
Highlight Feature Not Working
- Ensure you’re highlighting actual text content
- Try right-clicking after highlighting
- Clear browser cache if issues persist
Overall Best Practices
Start Small
Begin with one course and gradually expand your digital twin usage as you become comfortable.
Engage Students
Introduce your digital twin to students and explain how it can support their learning.
Monitor Performance
Regularly review how your digital twin is being used and adjust settings as needed.
Stay Updated
Keep informed about new features and capabilities as the platform evolves.