The quickest way to embed your Digital Twin is the built-in Integration Wizard — a visual configurator that generates ready-to-use embed code for you. You pick where the twin will run, configure how the widget looks and behaves with a live preview, then copy or download the finished file. No hand-editing of SDK templates required.
The wizard replaces the old copy-and-edit-a-template workflow for most integrations. The manual Installation, Integration, and Configuration steps below are still fully supported for when you want complete control or to understand what the generated code does.
Open your Digital Twin’s Instance Settings and select the Integration tab. The wizard is preset to the current twin, so you go straight to choosing a target.
Admin Instances list → Integration
Admins can open the wizard from the Integration button on the Instances list and pick which Digital Twin to generate code for.
From your Digital Twin, open the + options menu in the message bar, choose Settings, then Instance:
From the admin Instances list, select the twin to embed. (Skipped when you launch from Instance Settings — it uses the current twin.) The wizard warns you if the twin has no picture, since the widget button would otherwise show Pria’s default logo.
2
Pick a target
On the Integration tab, choose where the twin will run:
Target
Generates
Web page (JavaScript)
A single script for any website — loads on page ready, or wires up your own button.
React component
A drop-in <PriaWidget /> with mount/unmount lifecycle handled.
Python-served page (Flask)
A minimal Flask app serving a page with the widget pre-configured.
Canvas LMS theme
Custom JavaScript for your Canvas theme — every course page gets the twin.
Claude (LLM instructions)
A drop-in CLAUDE.md that teaches Claude to drive the twin through the REST API.
Use the visual configurator (with a live preview) to set the button position, button size, and toggles such as full screen, open on load, and Start in Convo mode (voice). An Advanced section exposes options like allowPop, noUI, and custom container IDs.
Configure the widget's position, size and behavior with a live preview.
4
Get the code
Preview the generated file, then copy it to your clipboard or download it. Paste it into your site — it works as-is.
Preview the generated code, then copy or download it.
The wizard offers a Visitor mode toggle that decides how users are identified:
On (default): the generated code gives each visitor a reusable guest identity — no sign-in required, and dormant guests are cleaned up automatically. Ideal for public, anonymous embeds.
Off: the code exposes a seam for your own sign-in, so you can pass real user identity (email, name, course, etc.) from your application.
Prefer to hand-code your integration, or want to understand exactly what the wizard produces? Keep reading — the sections below walk through installing the SDK and configuring it manually.
Further configure your integration (digital twin, user identity, display options)
Looking for a voice avatar instead of the full chat UI? The Avatar Embed Widget puts your Digital Twin’s talking avatar on any website with a single script tag — visitors converse with it anonymously, no user identity required.
Installation
Download the Web SDK and install the Javascript file in your website.
Integration
Choose between limited or standard integration option to integrate into your website.
Configuration
Customize the setup to specify which Digital Twin to connect to, User Identity and various display options.
Public Digital Twin Security ConsiderationsWhen making a Digital Twin publicly accessible (without user authentication), you must take the following precautions:
Credit Management
Set the Digital Twin to “Do Not Pool Credits” to prevent shared credit exploitation
Configure a reasonable credit allocation (e.g., 50 credits) for new guest registrations
Enable the Guest UI mode for anonymous access
Disable Use Location to prevent unwanted pop-ups
Access Control
Add your domain (e.g., https://your-domain.com) to the list of Authorized Public URLs
Only domains in this whitelist will be able to embed and access the Digital Twin
Tool Restrictions
Disable tools that could be exploited: call_rest, send_email, call_canvas, save_to_file, etc.
This reduces token usage and prevents malicious use of system capabilities
Prompt Engineering
Carefully craft your system prompt to keep conversations on-topic
Include guardrails to prevent users from repurposing the Digital Twin for unrelated queries
Public-facing Digital Twins are inherently more vulnerable to abuse. Users may attempt to exploit the credit system or use the AI for purposes beyond its intended scope.
Choose the integration approach that matches your JavaScript skill level and requirements — Limited embeds the UI with minimal code, the Starter Kit ships two ready-to-use examples, and Standard gives you full programmatic control.
Limited
Starter Kit
Standard
Embed the Digital Twin UI in your website header with:
<script src="pria-sdk-web.js"></script>
The pria-sdk-web.js file is the SDK you downloaded. Optionally, place this in a directory, e.g., /assets/js/pria-sdk-web.js.
This example demonstrates using the PriaIntegration class from pria-sdk-web.js for a streamlined integration:
// Load SDK with PriaIntegration helper classPriaIntegration.loadSdk(baseUrl, displayOptions, instanceConfig, userConfig);// Wait for SDK to be readyconst timer = setInterval(() => { if (window.pria && window.pria.isReady && window.pria.isReady()) { clearInterval(timer); // SDK is ready - user can interact with the button }}, 100);// Clean terminationPriaIntegration.destroySdk();
Best for: Quick integrations where you want the Digital Twin button to appear and let users click to start conversations naturally.
The displayOptions object controls the display and behavior of your digital twin on screen.
let displayOptions = { fullScreen: false, // Expand in full screen mode openOnLoad: false, // Open Pria immediately when loaded buttonWidth: '80px', // Size of the Pria logo button buttonPosition: 'fixed', // Button position type (fixed, relative, sticky) buttonPositionRight: '20px', // Distance from right edge buttonPositionBottom: '20px', // Distance from bottom edge buttonNoBounce: true, // Disable button bounce animation priaContainerId: '', // Container ID for Pria window (default: BODY) buttonContainerId: '', // Container ID for button (default: BODY) allowPop: false, // Allow popping out of containing iframe noUI: false, // Disable UI for headless operation convoMode: false, // Auto-start convo (voice) mode when ready assistantId: '', // Pre-select an assistant for TEXT mode at load transcripts: false // Receive live voice transcripts (see the JavaScript SDK page)}
Set noUI: true to use Pria programmatically without the visual interface
Adjust buttonPositionRight with CSS for positioning, e.g., calc(50% - 40px) for center alignment.
The convoMode display option lets you auto-start real-time voice (speech-to-speech) mode as soon as the Digital Twin determines that voice is available for the current user. This is useful when you want your application to launch directly into a voice experience without requiring the user to navigate through the text interface first.How it works: After the user authenticates, the SDK receives a convo.ready event from the Digital Twin indicating whether real-time voice is authorized. When convoMode is enabled, the SDK automatically sends a convo.start command and opens the UI panel.Values:
Value
Behavior
false (default)
No auto-start. Voice mode must be started manually.
true
Auto-start voice mode with the default assistant in a new conversation.
{ conversationId, conversationName, assistantId }
Auto-start voice mode targeting a specific conversation and/or assistant. All fields are optional.
Simple auto-start:
let displayOptions = { convoMode: true, fullScreen: true, openOnLoad: true}
Targeted auto-start with a specific assistant and conversation:
let displayOptions = { convoMode: { conversationId: 123, // maps to course_id conversationName: 'Customer Onboarding', // maps to course_name assistantId: '6bec24be-4e86-4071-b90f-d588' // target assistant _id }, fullScreen: true, openOnLoad: true}
convoMode requires that real-time voice (convo) is enabled for the user’s institution. If voice is not authorized, the flag is silently ignored and the text interface loads normally.
Open the embedded Digital Twin in normal text mode with a specific assistant already selected — no opening message is injected, and the user’s first typed message is routed to that assistant.
PriaIntegration.loadSdk(BASE_URL, { assistantId: 'YOUR_ASSISTANT_ID', // the assistant's _id (see assistants.list) openOnLoad: true}, instanceConfig, userConfig);
How it works: once the session is ready, the SDK sends a single assistant.select command. The chat shows the assistant as the pending choice; the conversation itself is only created when the user sends their first message, which carries the selection. After that first exchange the conversation keeps the assistant automatically.
Works for text-only institutions — voice does not need to be enabled.
If both assistantId and convoMode are supplied, convoMode (voice) takes precedence and the text-mode pre-select is skipped — including when voice turns out not to be authorized for that institution, in which case neither applies and the twin opens normally. Supply only assistantId if you want the pre-select to be the fallback.
An unknown or out-of-scope assistantId is rejected with an error response and the twin opens on its normal default assistant.
The pre-select fires once per session; if the user manually switches assistants afterwards, their choice is never overridden.
Set transcripts: true to receive the conversation’s live transcript (convo.transcript messages) on your page while a voice call runs. The Digital Twin must allow it (Share voice transcripts with the embedding page in its settings); otherwise the option is silently ignored. See Live voice transcripts.
The instanceConfig object configures which Digital Twin to use along with the picture rendered in the start button.
let instanceConfig = { publicId: '41407647-248c-4f0e-a317-71fc151ba8fb', // Public ID identifying your Digital Twin pictureUrl: 'https://cdn.domain.com/pics/dt_1.png', // Picture to use for the on-screen icon of your Digital Twin};
The publicId value supports three modalities:
Value
Behavior
A specific public instance ID
All connections route to that Digital Twin, regardless of the page URL.
'' (empty string)
Auto-routing — the system connects users to a Digital Twin based on the page URL. An administrator connects or creates the twin on first launch; the mapping then persists.
undefined
The Digital Twin does not start.
Leave pictureUrl empty for Pria’s default picture, or point it to a CORS-accessible image on a CDN.
Load these values securely and asynchronously—never expose sensitive data in your HTML.
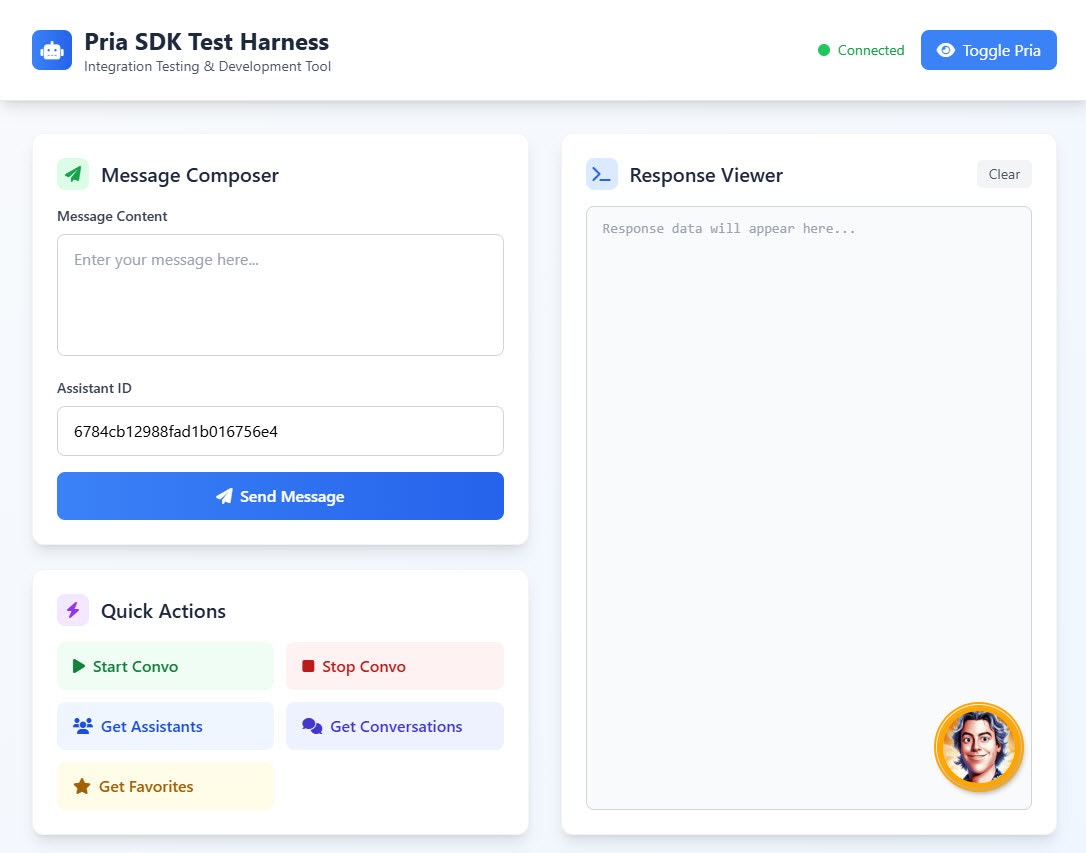
This example is provided AS IS to demonstrate how you can cleanly integrate a Digital Twin in your Web Application. It is extracted from the playground example code.
/** * Javascript Class integration example * Demonstrates modern patterns for Pria SDK integration */class PriaTestHarness { constructor() { this.pria = null; this.waitForPriaTimer = null; this.isConnected = false; this.conversationMode = 'existing'; // 'existing' or 'new' this.assistantsCache = []; // Cache assistants for lookup // Configuration this.config = { displayOptions: { buttonPositionRight: 'calc(50% - 40px)', buttonPositionBottom: '80px' }, instanceConfig: { publicId: 'f831501f-b645-481a-9cbb-331509aaf8c1', pictureUrl: 'https://cdn.domain.com/pics/dt_1.png' }, userConfig: { email: 'john@doe.com', profilename: 'John Doe', usertype: 1, userid: 110, roleid: 123, rolename: "Course ABC", partnerid: 1, partnername: "ABC Global Inc." }, localhost: true }; this.init(); } /** * Initialize the application */ async init() { try { await this.loadPriaSDK(); } catch (error) { console.error('Failed to initialize application:', error); } } /** * Load the Pria SDK */ loadPriaSDK() { return new Promise((resolve, reject) => { const script = document.createElement('script'); script.src = 'pria-sdk-web.js'; script.async = true; script.onload = () => { console.log('Web SDK Script loaded'); const url = 'https://pria.praxislxp.com'; PriaIntegration.loadSdk( url, this.config.displayOptions, this.config.instanceConfig, this.config.userConfig ); this.waitForPriaTimer = setInterval(() => this.waitForPria(), 1000); resolve(); }; script.onerror = (error) => { console.error('Failed to load Web SDK:', error); reject(new Error('Web SDK loading failed')); }; document.body.appendChild(script); }); } /** * Wait for Pria to be available and set up subscriptions */ waitForPria() { // Use isReady() to check if Pria is fully initialized if (!window.pria?.isReady()) { console.log("Waiting for Pria to load..."); return; } clearInterval(this.waitForPriaTimer); this.pria = window.pria; this.isConnected = true; // Subscribe to Pria responses this.pria.subscribe(this.handlePriaResponse.bind(this)); // Load assistants and conversations on connection this.loadAssistants(); this.loadConversations(); // Clean up on page unload window.addEventListener('beforeunload', () => { this.pria.unsubscribe(this.handlePriaResponse); this.pria.destroy(); // Clean up Pria resources }); } /** * Handle responses from Pria */ handlePriaResponse(response) { const command = response?.response?.command; const content = response?.response?.content; if (response.type === 'pria-response') { console.log("Processing command:", command); // Handle convo.start success - show UI if (command === 'convo.start') { this.showPria(); } else if (command === 'assistants.list' && content) { this.assistantsCache = content; console.log("Assistants loaded:", content.length); } else if (command === 'conversations.list' && content) { console.log("Conversations loaded:", content.length); } } else if (response.type === 'pria-error') { console.error("Pria error:", content); } } /** * Start a conversation */ startConversation(assistantId, conversationId, conversationName) { if (!this.isConnected) return; let request = { command: 'convo.start' }; if (assistantId) { request.assistantId = assistantId; } if (conversationId && conversationName) { request.selectedCourse = { course_id: conversationId, course_name: conversationName }; } this.pria.send(request); } /** * Load assistants list */ loadAssistants() { if (!this.isConnected) return; this.pria.send({ command: 'assistants.list' }); } /** * Load conversations list */ loadConversations() { if (!this.isConnected) return; this.pria.send({ command: 'conversations.list' }); } /** * Toggle Pria visibility (show/hide entirely) */ togglePriaVisibility(visible) { if (!this.isConnected) return; this.pria.setVisible(visible); } /** * Toggle Pria panel display (expand/collapse) */ togglePriaDisplay() { if (!this.isConnected) return; // Use SDK's isDisplayed() to check current state const isCurrentlyDisplayed = this.pria.isDisplayed(); this.pria.display(!isCurrentlyDisplayed); } /** * Show Pria interface */ showPria() { if (!this.pria) return; // Check if UI is already shown using SDK's isDisplayed() if (!this.pria.isDisplayed()) { this.pria.display(true); } }}// Initialize the application when DOM is loadeddocument.addEventListener('DOMContentLoaded', () => { new PriaTestHarness();});
When you need to remove Pria or reload it with new configuration:
// Destroy SDK completely (removes all UI, event listeners, and references)PriaIntegration.destroySdk();// Reload with new or existing configurationPriaIntegration.reloadSdk( 'https://pria.praxislxp.com', displayOptions, instanceConfig, userConfig);
After calling destroy() or destroySdk(), all existing references to pria become invalid. The SDK must be fully reloaded before use.